How to make an impression of a key?
To get an impression
, apply a thin layer of plasticine no more than one and a half millimeters thick to the metal plate.
The plasticine is lubricated with oil to prevent it from sticking to the key. Press the key
onto the plasticine so that it leaves a clear, even imprint.
Interesting materials:
When should you dig up rye? When should you dig up green manure? When should you plant Remontant strawberries? When should I register my quadcopter? When should Mulard ducks be slaughtered? When should you plant currant bushes? When should you pick winter apples? When should you fertilize blueberries? When should nitrogen fertilizers be applied? When should you dig up tulip bulbs?
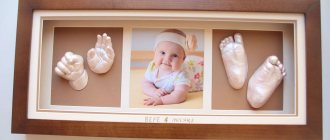
Technology for making impressions in 2D format
Technology for making impressions in 2D format To make plaster casts in 2D format, a hypoallergenic material is used that produces exact copies of impressions. The completed work will look like this: plaster casts are painted and glued to the photo, the photo is pre-processed with Photoshop and printed. The casts are glued using double-sided tape.
This entire composition is placed in a baguette frame under glass.
The cost of the work depends on the number of impressions ordered.
For example: You made a cast of one arm and leg and designed everything properly, as indicated above, then your work is calculated as follows:
- 1 cast of a handle – 500 RUR (painted)
- 1 cast of a leg – 500 RUR (painted)
- photo processed and printed (21cm*31cm) – 100 rubles (the price includes processing and printing in a photo salon in our city)
- baguette frame (the average cost of frames is from 250 - 350 rubles), but there are frames that are much more expensive, it all depends on the client’s desire and the size of his wallet).
Also, the cost of the frame depends on the distance between the photo and the glass. The shorter the distance, the cheaper the frame. Since our casts are thin and miniature, we can easily place them in a thinner frame. I recommend ordering a framing frame, taking a mold with you, then you will save money, and most importantly, you will be able to calculate everything accurately.
In total, you take your legal 1,500 rubles from the client.
Well, here are your costs:
- impression of a pen (painted) – 20 rubles
- cast of the leg (painted) – 20 rubles
- photo (if in a photo salon) – 100 rubles
- baguette frame (we take the maximum) – 350 rubles
In total, you spend 490 rubles and 20 - 30 minutes of your time. Thus, your net income = 1000 rubles. What are blinds made of?
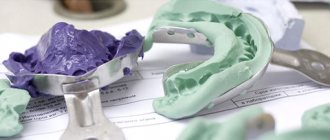
The casts themselves are made of plaster. But to make it, you first need to make an impression (print). And for the impression, we use impression material that can convey every feature, line of the palm or foot of your child.
That's the whole secret. There are a lot of materials similar to the impression material that we need, for example, dough, plasticine and others like them, but none of them will convey, on plaster, all the subtleties that we need. And only kneadable impression material – group C (CE)-silicone will perform this task flawlessly.
A new question immediately arises: where to buy it?
Answer: at a dental store.
I repeat once again, you need group C silicone (ce). It is used in dentistry (Polysiloxane) to make impressions. The base mass perfectly conveys all the subtleties of the human body. It is safe, odorless, has a soft consistency, very similar to dough.
In our city, such material (C-silicone) costs 1.75 kg = 1200 rubles. This material is reusable. It will be enough to take casts of all the children in your city. When purchasing a material (Basic mass C-silicone), you may be offered to take a hardener for it, but you will refuse because You don't need him.
To make an impression, I come to the customer’s home at a time convenient for him.
We take silicone out of our jar, about a third of it, warm it in our hands,
then add DRY gypsum to it (like flour in dough), because in its pure form the silicone will float and your print will spread in different directions.
Knead to a stiff dough.
We take not a deep, preferably almost flat, but definitely a plastic plate, it bends and it is easier to remove the impression from it later. We lay our silicone dough into a dense flat cake, 1.5 cm thick.
We take the child’s hand and carefully place it on our cake, while straightening the fingers.
If a child grabs the cake, it’s okay, mix it again, or leave it like that and pour it in, it also turns out very interesting, as if in motion.
And that’s it, we put the pen away, see if everything suits us, and go home.
You do all the rest of the work at home.
Now plaster. For the best results, it is advisable to purchase dental plaster (it is super strong), although G6 or G16 sculpture plaster is also excellent for children's impressions. Specifically for children, because their hands are small and their fingers are also small. For the strength of the gypsum, when diluting it, you need to add PVA glue (2 teaspoons). Plaster can be purchased at any hardware store. Take a small container, mix the plaster with water (water + plaster) until the consistency of thick sour cream, not forgetting about PVA glue, and pour it into the impression you made.
After 2 hours, carefully remove the finished plaster cast
and bring it to mind with a regular knife, because... gypsum is still damp, it is easier to process. Be most careful in the toe area.
Leave for a day until completely dry, if necessary, sand the edges with sandpaper or natfil.
And only then paint with aerosol or acrylic (less effective) paint. I use paint in cans of two popular colors - gold or silver (price no more than 200 rubles). Very economical to use.
IMPORTANT. When you take the finished impression out of the silicone mold, do not rush to crush it and put it away.
Leave it just in case you break or damage the cast during processing. Crumple the used silicone and store in a closed container at room temperature.
YOU MAY NOT BE ABLE TO FIND THE EXACT SAME SILICONE. SO LOOK FOR AN ANALOGUE!!!!
Good luck.
This technology for making impressions in 2D format is entirely owned by Kristina Viktorovna Kotelva.
Master class No. 2. Your hands and plaster
To make a realistic plaster hand with your own hands, follow the steps from tutorial No. 2.
You will need:
- gypsum;
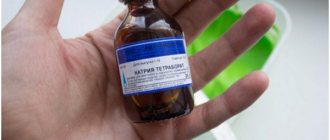
- alginate powder;
- container in which the plaster will be mixed;
- a container in which the alginate powder will be mixed;
- water;
- oil;
- stationery knife.
Let's look at the process of creating the plaster hand itself, without touching on the coloring process afterwards. You may not decorate such a hand with anything at all, leaving it looking like part of an ancient Greek sculpture. Or you can paint it in skin color to give the plaster hand maximum realism.
Reviews
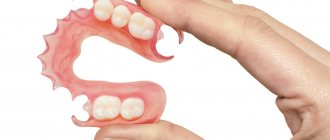
The variety of impression materials used in modern prosthetic dentistry is explained by the wide variety of clinical situations that specialists have to face in the process of treating patients.
Each of the substances has both advantages and disadvantages, so the right to choose a certain mass is the prerogative of the dentist and depends on many nuances.
If you have ever experienced the procedure of making an impression of jaw rows using any material, share your feelings in the comments section.
If you find an error, please select a piece of text and press Ctrl+Enter.
Tags fixed dentures impression materials prosthetics
Did you like the article? stay tuned
Previous article
Suspension “Liquid enamel” from INNOVA
Next article
What factors provoke tooth wear and a competent approach to eliminating the problem?
Preparation
Prepare the necessary material, accessories and tools in advance:
- Alginate mass for impressions;
- Gypsum;
- Stirrer (stirring stick), spoon and, if available, hand mixer;
- Water;
- Bucket or plastic container;
- Measuring cup, scales;
- Primer, protective varnish, sandpaper and acrylic paint for subsequent processing and finishing! (optional).
Prepare all the materials in advance because you will have very little time when you start mixing materials! The alginate mixture must be processed as soon as possible before setting time begins.
Preparation of the solution
A plaster hand is cast with your own hands in a pre-prepared mold. The mixing container is filled with clean cold water in the required quantity. Dry gypsum powder is evenly poured into it. Ideally, it should form a slide above the surface.
The gypsum begins to intensively absorb water. At this time it needs to be stirred well. This should not be done too intensely, as air bubbles will form. They remain in the solution, fall into the mold and, after it hardens, form shells and cavities. Therefore, you can use a drill with a kneading attachment only at low speeds. It's best to do everything by hand using a spoon or wooden stirrer. The goal is to obtain a homogeneous mass without lumps, reminiscent of sour cream in thickness.
The water/gypsum proportions (approximately one to two) are determined experimentally in advance. After mixing is completed, tap the container lightly to release air bubbles to the surface. The resulting foam is collected with a spoon. The prepared working solution is immediately poured into the mold. The time from the start of mixing to pouring is no more than a minute and a half.
Pros and cons of a business idea
Pros of the project:
- Simple and clear processes
- Possibility to combine with main job
- Low running costs
Disadvantages of the project:
- Ceiling for growth and development
- Inability to meet constant demand
- Changeable fashion for products
Making impressions is a great project to earn extra income. It is difficult to evaluate it as a full-fledged business, but with proper demand it can bring pleasant profits. Good luck!