Save and read later -
Music is not only the sound itself, but also the atmosphere around it. For example, vinyl: caring for a player and record collection is a whole ritual for many connoisseurs.
But above all, this is a necessity, because otherwise the records will deteriorate, sound bad, and the collection will look untidy. In this article we will tell you what a beginner vinyl lover needs to do.
Photo by soaringbird / CC-BY
The tips discussed below fall into the basic category. This means that they will be relevant for all vinyl lovers, and especially for beginners - regardless of whether you bought your first turntable or decided to revive an old device and listen to records from childhood. If you follow a few simple rules, your new equipment will last you longer, and old and rare recordings will not soon lose their charm.
Store records in special sleeves
After listening to the record, put it back in the envelope so that it doesn’t gather dust or you accidentally spill something on it. At the same time, if you often listen to a record, take it out and put it back and forth, then the original sleeve will sooner or later become unusable. In addition, regular paper sleeves can scratch the record. A scratched section of the record will sound distorted, and if the damage is severe, it may not play at all.
Photo heidl / Public Domain Mark 1.0
Envelopes are divided into outer and inner. External ones can be anything - as long as you like them. And the internal ones should protect the records from dust, scratches, and the accumulation of static electricity, so you shouldn’t choose just which ones. It is best to use plastic or polypropylene envelopes.
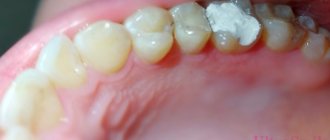
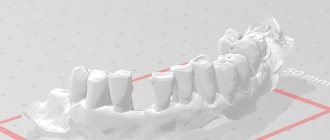
What are dental plates?
Children's dental braces are also called braces and retainers. These structures are used to correct malocclusion in children with single irregularities. Plates are also prescribed after wearing braces to consolidate their effect.
Plates for children differ in their structure, however, they all have the same key elements. The basis of these orthodontic devices are rigid plates (wires) and attachments.
The plate can also be made from soft plastic or a medium-hard material curved to fit the shape of the child's palate. The main function of the plastic is to hold the arc, made from an alloy of titanium and nickel.
It is the titanium-nickel arc that provides the leveling effect. This element has a “memory”, the original shape of the wire (set by the dentist), the plate does not change over time with chewing and load on the jaws.
While worn, the plate constantly acts on the crowns of the teeth and gradually moves them in a given direction. The dentist can choose a device of different thicknesses for the child, from very thin, when the bite is just forming, to quite large.
Fastening in the plates is ensured by a mechanism at the base of the structure. This assembly is equipped with a small screwdriver for adjustment. Some plates also include additional elements such as built-in activators. This part can be twisted frequently to keep the arc tight.
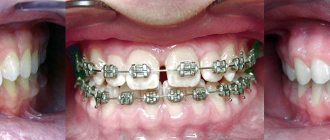
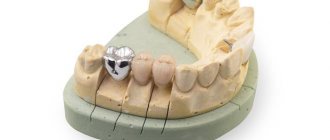
How do plates differ from braces?
Many people still confuse braces and plates for straightening teeth in children. Indeed, both of these devices are orthodontic appliances and both correct the bite.
However, braces are part of the multiboarding system. This design is glued to the teeth, and an arch with “shape memory” is inserted into the grooves. With the help of this arch, the teeth are gradually aligned and the bite is corrected.
Braces are suitable for adults and older teenagers (over 12 years old) with mature permanent teeth. Plates are most often placed on children with a mixed dentition, baby teeth and unformed permanent rows. If you have a permanent bite, the teeth straightening plate will be less effective. Using braces at an early age can change the development of the skull bones.
Types of plates
All plates for aligning and straightening children’s teeth are divided into two types:
- Removable.
The most popular option for orthodontic structures. The plates are attached to the teeth daily, but can sometimes be removed. The main advantages of the designs are their low price and ease of use. Dentists recommend using removable plates to straighten one tooth that is slightly misaligned. Today, there are many designs with different structural features: plates with an arm-shaped process, single-jaw models, devices with an active spring pusher, a retraction arch, and others. The average treatment period with removable plates is 1.5-2 months.
- Fixed
. Dentists recommend installing such plates on children who need correction of a group of teeth that requires longer exposure. The designs of fixed plates have special locks through which the arc is passed. Through these clasps, the doctor periodically tightens the structure so that the crowns of the teeth remain under the required pressure. The average treatment period with fixed plates is 2 years and is precisely determined by the orthodontist.
Removable plates are cheaper than fixed structures and are easy to use. Indeed, if desired or necessary, the child can remove the plate and take a break from the structure. However, behind this simplicity lies a great danger: at school or kindergarten, parents cannot control the baby, and he begins to uncontrollably remove the plate and enjoy life without it. As a result, the teeth simply do not align.
Indications
As you already know, plates for straightening teeth in children are installed when one tooth is displaced or several teeth are incorrectly positioned. These designs are also recommended by dentists for pathologies such as:
- Problem of jaw bone development;
- Slowing or activating jaw growth;
- Narrowing of the palate;
- Displacement of teeth after using braces;
- Rare arrangement of dental crowns.
Dentists recommend installing a plate to straighten teeth in children under 12 years of age. Firstly, at this age it is much easier to correct the shape of the dental system. And secondly, children at a young age can more easily tolerate the procedure for installing the plate and do not worry about their appearance.
Away from sun, heat and moisture
It is unlikely that you will be able to allocate a separate room for storing records and monitor its microclimate, but you still need to follow simple conditions.
Place records away from radiators, heaters and other heat sources. These sources can be the most unobvious - for example, cats. Brittany McCrigler told the story of how her cat took a nap on the record, leaving his mark on it. Fortunately, the record was restored with the help of two plates and an oven.
To prevent fungi and mold from growing on envelopes, avoid damp places. We understand that you are not going to put a cabinet with records in the bathroom, but you shouldn’t store them, say, in a wooden house or in a garage. Finally, your collection should not be exposed to direct sunlight to prevent the roots from fading.
How long to wear the design
Before the doctor installs plates on the teeth of children or when he places them on adults, he makes a preliminary calculation of the time it will take to treat the pathology. This period is approximate and can be reduced or increased depending on the individual reaction and speed of curvature correction. On average, a non-removable system is worn for a year or two, followed by the installation of a retainer to consolidate the result (it is used for as long as possible). If the arch is installed for a child whose jaw is at the stage of formation, most likely, the device will require replacement approximately every six months.
To obtain accurate information on how long and how to wear dental plates correctly, you need to see at least the first results of treatment.
How to clean records
A budget option is microfiber cloths. They can easily remove simple contaminants: dust on the surface, dirt and grease from your fingers. On the other hand, microfiber particles can become clogged in the sound grooves. To clean the record more thoroughly and, most importantly, without consequences, you need to use special brushes.
The most advanced option is a vinyl cleaning machine. It, in combination with a cleaning liquid, gives the best result, completely removing dirt from the records.
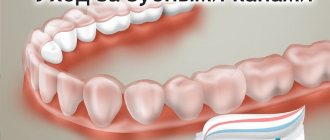
Rules for daily hygiene care
To clean the mouthguard, it is enough to purchase an additional brush with soft bristles (too hard can lead to scratches). Full hygiene procedures should be carried out in the morning and evening - you need to brush your teeth in a completely traditional way. The procedure is as follows:
- brush your teeth,
- rinse the mouthguard under running warm water,
- clean the inner and outer surfaces of the aligner with a brush and adding a small amount of toothpaste (can be replaced with regular baby soap),
- rinse thoroughly with warm running water,
- fix on teeth.
Living with a stoma: instructions for dummies
What will the stoma look like and how will it feel after the operation? The first days after surgery can be difficult. A colostomy bag (urine bag) will be taped to your abdomen around the stoma and you will have a lot to learn. Now is the time to get to know your stoma.
What does she look like after surgery?
When you come to your senses after surgery, you will find your first colostomy bag on your stomach. It will likely be clear to make it easier for medical professionals to monitor the condition of your stoma. You may also be given IVs and drains. This is completely normal, and when no longer necessary, they will be removed.
- Your stoma
Your stoma will be moist, pinkish-red in color, and should protrude above the surface of your abdomen (although quite often stomas are also at skin level or below). The stoma may be quite swollen at first, but gradually, usually 6–8 weeks after surgery, it will shrink in size. The stoma is reddish in color because it is a mucous membrane just like the lining of the mouth. The stoma does not have any sensation, so touching it is painless. During treatment, the stoma may bleed a little, especially at first, but this is quite normal and should stop soon.
Your stoma will begin to function soon after surgery, usually within a few days. At first, it will release a watery fluid with a strong odor because your bowels haven't been functioning for a while. However, there is no need to worry - as you return to a balanced diet, the consistency of your stool will become slightly thicker and the odor will decrease. Your doctor will advise you on how to eat properly.
It is also possible that some gas will be noisily released from the stoma at first - this is completely normal. You may often feel the urge to have a bowel movement as before. This is normal and should go away with time. If the anus is preserved, a small amount of mucus may be released from it, but this problem can be solved.
- Urostomy
If you have had a urostomy removed, it will begin to function immediately after the operation. There will be a catheter in the urostomy for the first seven to ten days. At first, the urine may be reddish in color, but soon everything will return to normal.
How to deal with swelling or sticking of the walls of the bag
Bloating occurs when gas accumulates in the colostomy bag, i.e. the bag inflates like a balloon. Many colostomy bags are equipped with carbon filters that remove excess gas from the bag and neutralize odor. Insufficient filter efficiency or damage to the filter by moisture and feces can lead to the accumulation of gases in the colostomy bag.
- How to prevent swelling of the bag?
The best way to prevent pouch bloating is to minimize the amount of gas your digestive system produces. To do this, chew your food thoroughly and do not consume foods and drinks that cause increased gas formation. For example: nuts, beans, carbonated soft drinks or wine.
If you use one-piece drainable or two-piece colostomy bags, then when the bag swells, excess gas can be released in the toilet. Timely replacement of the colostomy bag can also prevent swelling of the bag. Finally, it may be worth trying a different colostomy bag with a more efficient filter.
The sticking of the bag walls occurs when a vacuum forms inside the bag. Clumping causes feces to accumulate at the top of the bag, which can damage (block) the filter. In this case, the bag may come off.
- How to prevent the walls of the bag from sticking together?
Before gluing the colostomy bag, inflate the bag slightly to prevent a vacuum from forming. You can also drop oil or lubricant into the colostomy bag, which will make the walls of the bag slippery and help stool quickly fall to the bottom of the bag.
Skin irritation around the stoma
The skin around your stoma should look the same as other parts of your body. Immediately after peeling off the colostomy bag, the skin may turn slightly red, but if its color does not return, this means that the skin is damaged.
What should I do?
- Peel off the colostomy bag (urine bag) and inspect the plate. Is the plate damaged by feces or urine?
- Is the damage or irritation to the skin around the stoma the same as what you see on the plate?
- How hermetically sealed is the colostomy bag? If the colostomy bag does not fit tightly to the skin, or if the hole in the adhesive plate is larger than the size of your stoma, stool or urine from the stoma may come into contact with the skin, causing irritation. Determine if the size and shape of your stoma matches the size and shape of the template you are using. Use the protective covering of the adhesive pad as a template and, if necessary, adjust the hole in the adhesive pad so that it exactly matches the size and shape of the stoma. Before gluing the colostomy bag, you must use a skin cleaner.
- How is your stoma located relative to the surface of your abdomen? Is it above, level or below the surface of the skin? If your stoma is level or below the surface of the skin or in a deep crease, you may need a different type of colostomy bag and accessories. Ask your ostomy care professional to find a product that is more suitable for you.
- Is the adhesive plate damaged? If this is the case, then you may need to change your colostomy bags (urine bags) more often. Try changing colostomy bags (urine bags) more often or consider using adhesive sheets that are more resistant to erosion.
If skin irritation is due to other reasons, consult a specialist.
People have different physiques - colostomy bags (urine bags) are also different
After ostomy surgery, your body shape may change for a number of reasons. For example:
- weight gain or loss as you recover from the illness that led to surgery;
- the appearance of folds or scars on the skin around the stoma;
- formation of parastomal hernia.
If your body shape has changed, you need to make sure that the colostomy bag (colostomy bag) still fits you.
Select a suitable colostomy bag (urine bag) For proper stoma care, it is necessary that the colostomy bag (urine bag) be hermetically glued to the skin. For example, if the area around the stoma becomes not flat, but retracted, then perhaps convex colostomy bags (uropods) should be used. You may also need additional accessories.