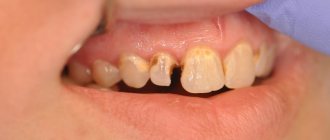
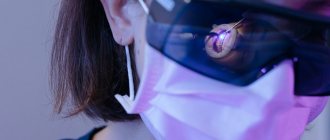
The external attractiveness of the dentition is an important factor that provides psychological confidence to the patient. Unfortunately, standard hygiene procedures, even when carried out regularly, do not guarantee the preservation of enamel in proper condition. Professional grinding allows you to restore the natural shade of teeth, as well as remove plaque accumulations that form in hard-to-reach areas. The cost of ultrasonic teeth cleaning at the dentist is fully compensated by the results achieved, so for those who prefer to take care of their own health, it is recommended to pay attention to the proposed option.
Features, recommendations and contraindications
Grinding is one of the stages included in a comprehensive teeth cleaning program. The procedure is an intermediate link between removing stone deposits and polishing the enamel. It is important to take into account that the active impact on the dentition carried out during the grinding process is a stress factor, the negative consequences of which can be neutralized by special compositions that help strengthen the enamel layer.
The purpose of the procedure is determined by the presence of the following factors identified during the preliminary examination:
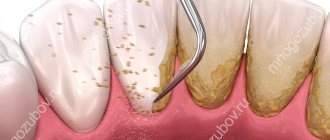
- The need to remove fossilized plaque, which worsens the shade of the enamel and contributes to the development of pathological processes, which result in the occurrence of caries and diseases of the gum tissue;
- Discomfort experienced by the patient due to disruption of the natural smooth structure of the enamel coating associated with professional cleaning performed mechanically or ultrasonic;
- Preparation for orthodontic treatment, which involves the installation of permanent or removable corrective structures, including braces and mouth guards.
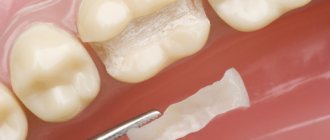
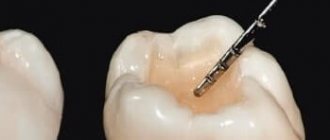
Grinding is also carried out when filling the dentition - the procedure for processing the restored surface allows you to achieve the desired shape of the crown, restore occlusion and remove excess material that has gone through the polymerization stage. It is important to take into account the features of the anatomical structure of teeth - both from the point of view of aesthetics and from the point of view of preventing possible diseases associated with the development of inflammatory processes, malocclusion and other factors that arise against the background of improper treatment of the unit.
The factors limiting the possibility of providing the service include the same phenomena as in the case of other dental procedures:
- Diagnosis of viral and infectious diseases;
- Identification of inflammatory foci affecting mucous tissues;
- Carious and other dental pathologies;
- Thinning of the enamel coating.
The decision on the need for dental polishing is based on the results of the clinical picture formed during the examination.
Causes of discomfort after treatment
Have you gone to the dentist with acute pain, but after all the manipulations it has become aching? In some cases, this is a variant of the norm. Unfortunately, an advanced inflammatory process cannot be stopped instantly. The longer a person puts off visiting the dentist, the longer the recovery will take. In addition, treatment of advanced pulpitis or periodontitis is a complex procedure that inevitably damages tissue. This is why the discomfort will persist for some time. They should become less pronounced every day.
The treating physician may recommend safe pain relievers, anti-inflammatory medications, and rinses. Without consulting a specialist, you should not take medications or rinse your mouth - this can only worsen the problem. Do not heat the affected area under any circumstances.
It is necessary to urgently seek advice from a specialist if, after all the manipulations:
- the pain only gets worse,
- the temperature has risen,
- swollen gums and cheek,
- there was an unpleasant odor from the mouth,
- pus oozes from under the crown.
All this indicates the development of complications. These are often caused by mistakes made during cleaning and filling. If the tissue under the filling becomes inflamed, it must be removed and treated again.
Methods of conducting
The price of professional teeth cleaning depends on the number of manipulations performed, which, as a rule, include not only ultrasonic treatment of the enamel surface and grinding, but also additional procedures aimed at strengthening the structure and evening out the shade.
Dental grinding involves the use of the following techniques:
- Standard treatment of the crown using a drill, during which an abrasive paste is used, as well as a device that has a mechanical effect on the enamel structure. Despite the simplicity and accessibility of the procedure, many patients try to avoid it whenever possible - due to the accompanying discomfort associated with heating the treated area of the oral cavity, specific sound, and active vibration.
- Air grinding of teeth is a more gentle technique, the use of which reduces the level of impact on both tooth enamel and adjacent tissues. Saving time and money spent on anesthesia determine the popularity of the service.
Step-by-step sanding and polishing protocol - Part 1
We often discuss the problems and difficulties of restoring teeth and choosing shades for direct composite restorations. However, the shape and texture of the restoration play an important role, as does the choice of shade.
When creating a direct restoration, we must follow a step-by-step protocol to achieve esthetic, natural and predictable results. Stages of work include treatment planning, tooth preparation, adhesive procedures, layering of material, grinding and polishing of the finished restoration.
Natural teeth are rich in a variety of small structural features that must be replicated in the restoration for it to integrate well into the oral cavity. These details are: length, width, proportions, length to width ratios, contour, flat areas, lobes, ridges, vertical grooves, texture, wear chamfers, cutting edge thickness, fracture lines, perikymata, contact points and contact surfaces, embrasures, concave palatines surface and the presence of a girdle (cingulum).
In this way, details of shape and texture become integral to the integration of the restoration with the rest of the patient's natural teeth and smile.
First, you need to determine the type of surface of the patient’s natural teeth - determine whether there is a specific texture or a smooth surface without distinctive features. Observation of natural teeth becomes fundamental for us. This way we can understand what we should reproduce in the restoration. Examining a patient's front teeth from different angles can provide rich information about details of shape and texture.
If direct observation is insufficient or difficult, auxiliary texture identification methods, such as silver powder or articulation paper, can be used, which are applied to the labial surface of the natural tooth. Using such methods, it is possible to observe differences between areas of high light reflection and areas of darkness, more convex areas and recesses of more or less detail.
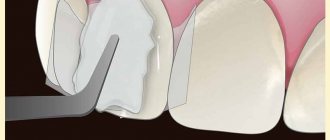
When the surface of the natural teeth we need to replicate is smooth, the clinical reproduction process is simplified, as we will have to perform fewer steps: refining the shape, polishing and adding shine.
If we wish to obtain a polished and textured tooth, we can divide this procedure into four steps:
clarifying the details of the form;
macrotexture details;
microtexture details;
adding brightness.
Form of restoration
The first step of grinding and polishing involves checking and/or correcting the shape of the tooth. The shape is responsible for symmetrical proportions and integration of the restoration with the rest of the teeth. To check the shape, you need to identify the corner lines that separate the flat area of high light reflection (between the corner lines) from the shading areas that are rounded and lie behind the corner lines.
By working in the spaces between the angular lines, we can create the optical illusion of wider or narrower, longer or shorter teeth, while maintaining the actual proportions of the tooth. Therefore, if we want to create the illusion that the tooth is narrower, we need to bring the angular lines closer together, reducing the flat area. On the other hand, if we want to visually widen the tooth, we need to move the angular lines apart, expanding the flat area.
Typically, this correction of angled lines and flat areas is performed with medium-grit discs or fine-grit diamond burs.
Next, you need to outline the contour of the embrasures on the cutting edge. It can be either straight or curved. Typically, the distal corner of the tooth crown is more rounded than the mesial corner. In a woman's smile, the embrasures of the incisal edge are usually more rounded.
The contours of the embrasures are usually formed using abrasive discs. Almost all abrasive wheel manufacturers offer four color-coded particle sizes. During the sanding process, we typically only use discs with two intermediate particle sizes (for example, Sof-Lex (3M) discs in dark orange and light orange). This is due to the fact that using a whiter abrasive material removes too much of the composite layer, while using a less abrasive material can only achieve an increase in the brightness of the composite.
To complete the stage of clarifying the details of the form, it is necessary to check and/or correct the vestibular contour of the restoration, observing the transitions and inclinations between the cervical, middle and incisal thirds of the crown. This procedure is usually performed with medium to fine grit diamond burs (depending on the amount of composite to be removed).
Before moving on to macro- and/or microstructural details, polish the proximal surfaces and remove excess composite from the cervical area.
Interproximal polishing is performed with sandpaper strips. They may be more or less abrasive (eg, Epitex, GC) depending on the amount of material on the proximal walls that needs to be removed and polished.
If there is too much excess material in the area of the gingival embrasures or there is a need to refine them, you should use metal polishing strips. They also differ in abrasiveness (for example, from GC, Edenta, Intensive, Coltène, etc.).
Excess in the cervical area of the restoration can be removed using a No. 12 surgical scalpel (by cutting away from the center of the tooth) or using a special Excesso instrument (LM Art Excess).
After detailing the shape and contour, it is recommended to treat the restoration with a rubber head or rubber disk to smooth the entire surface.
After correcting the shape, contour and volume of the restoration, if we want to create a textured tooth, we proceed to the details of the macrotexture.
Macrotexture
Macrotexture details can be divided into two groups: vertical macrotexture and horizontal macrotexture.
The vertical macrotexture, especially in the upper incisors, may be called vertical grooves or "V-grooves." This macrotexture displays the topography formed by the three lobes of tooth development (mesial, central, and distal) and the depressions between them (commonly called grooves). These vertical grooves are usually more open towards the incisal edge and taper towards the cervical region, giving the groove a V-shape. There are usually two vertical grooves, of which the distal one is usually longer than the mesial one. The vertical macrotexture is formed using fine-grained diamond burs at low rotation speed.
The horizontal macrotexture is more noticeable in the cervical third and in the area of its transition to the middle third of the crown. It includes 2-3 small, very smooth horizontal grooves that are located between the angular lines. At this stage, ball-shaped fine-grained diamond burs are usually used at low rotation speed.
After refining the vertical and horizontal macrotexture, it is necessary to smooth out the roughness after treating the composite with burs. Rubber tools are used for this.
There are different types of rubber polishers for smoothing macro-texture depending on the size of the job and the degree of polish desired.
Manufacturers offer systems of rubber tools of various grits (for example, Astropol, Ivoclar). When tools with different grits are available, the entire system must be used, starting with the most abrasive and ending with the least abrasive polishers.
Rubber polishers need to be passed along the vertical and horizontal lines previously marked with burs until a smooth surface is obtained with smooth transitions from recesses to convex areas (lobes).
After smoothing the macrotexture, we begin to create vertical and horizontal microtexture (if it is present in adjacent natural teeth).
Microtexture
The vertical microtexture is represented by small vertical grooves, usually running in the center of the vertical grooves of the macrotexture.
The horizontal microtexture is represented by thin horizontal lines running from the cervical region to the cutting edge of the vestibular surface. These lines, commonly called perikymata, are extremely thin and located very close to each other.
At this stage, a very fine diamond bur should be used, positioned at an angle of approximately 45 degrees to the labial surface of the restoration, applying very light pressure and moving in one direction (from the mesial to the distal edge or vice versa).
After recreating the microtexture, the surface of the composite must be slightly smoothed. Low abrasive rubber polishers or spiral tools such as Sof-Lex Spiral (3M ESPE) or ShapeGuard (Coltène) can be used. In addition to smoothing the composite and giving it a natural appearance, they also add shine to the restoration. If the natural tooth does not have a very bright surface or a low level of shine, the restoration can be finished after this step.
Brightness and shine
To complete the grinding and polishing process and to give the composite a natural enamel shine, it is recommended to use fine particle diamond pastes (less than 0.5 microns) or aluminum oxide pastes. These pastes are used with a felt disc or soft brush to avoid scratching the surface of the composite material. Applying light pressure, make circular movements at low rotation speed (maximum 5000 rpm).
The above steps can be performed with or without water supply. The advantage of working without water spray is better visibility of parts. In this case, it is worth using a large amount of water after each stage to cool the tooth and rinse off any residual material created by the instruments.
To accurately recreate parts, it is recommended to work with a low-speed contra-angle handpiece.
This first article on grinding and polishing composite restorations focuses on direct restorations on anterior teeth. The images demonstrate the most important aspects of identifying the surface and shape of natural teeth, a step-by-step protocol for creating the appropriate natural texture, and the materials needed for the job.
Image 1 – Front view of the patient's teeth. Observation of natural teeth becomes fundamental for us. This way we can understand what we should reproduce in the restoration.
Image 2 – For direct composite restorations, the shape is much more important than the shade of the material. If you change the shape of the tooth, you can completely change the integration of the restoration.
Image 3 – Angular lines define the shape of the tooth.
Image 4 – Teeth with little texture and a smooth surface. Observing a patient's front teeth from different angles can give us a wealth of information about the details of shape and texture.
Image 5 – Teeth with rich surface texture.
Image 6 – Horizontal macrotexture on the central incisors.
Image 7 – Horizontal microtexture (perikymata) on the anterior teeth.
Image 8 – One material for texture identification is silver powder.
Image 9 – Two methods for identifying texture: using silver powder and articulating paper.
Image 10 – Sof-Lex (3M) abrasive disc polishing system.
Image 11 – Diatech SwissFlex (Coltène) abrasive disc polishing system.
Image 12 – OptiDisc (Kerr) abrasive disc polishing system.
Image 13 – Excesso tool (LM Arte from Style Italiano) to remove excess composite in the cervical area.
Image 14 – Interproximal polishing is performed with strips. They can be more or less abrasive (Epitex, GC).
Image 15 – If there is too much excess material in the area of the gingival embrasures, metal polishing strips (GC) should be used.
Image 16 – There are several finishing tool kits that allow you to recreate the desired texture (for example, Finishing Style from Style Italiano or Brilliant Dentistry from Diatech).
Image 17 – Some of the burs that can be used to create macro and micro texture details (Brilliant Dentistry by Diatech).
Image 18 – Fine-grained bur No. 864 014 12F can be used to correct angular lines, the profile of the vestibular surface and form macrotexture details.
Image 19 – Diamond bur No. 898 016 11ML can be used to correct the profile of the vestibular surface to remove excess composite.
Image 20 – Using a fine-grained bur No. 801 023 F, a horizontal macrotexture can be formed in the cervical third of the tooth.
Image 21 – Fine-grained bur No. 853 008 3.5XF can be used to form horizontal microtexture (perikimats) and vertical microtexture.
Image 22 – Smoothing of the surface of the composite material should be done using rubber tools.
Image 23 – When tools with different grits are available, the entire system must be used, starting with the most abrasive and ending with the least abrasive polishers.
Image 24 – Advanced rubber polishers (Denstply).
Image 25 – Silicon carbide brushes. They can be used to brighten a restoration, but if applied too much pressure they can scratch the surface of the composite.
Image 26 – Low abrasive rubber polishers or new spiral tools such as Sof-Lex Diamond Spiral (3M ESPE) or ShapeGuard (Coltène) can be used to smooth and shine the surface.
Image 27 – Polishing pastes should be applied using a felt pad or soft brush to avoid scratching the surface of the composite (e.g. Flexibuff, Cosmedent).
Image 28 – To give the composite the shine of natural enamel, it is recommended to use fine-particle diamond pastes or aluminum oxide pastes (for example, Diashine Intra Oral polishing paste).
Image 29 – To recreate the natural shape of the tooth, it is necessary to evaluate the angular lines, the contour of the incisal embrasures and the vestibular contour.
Image 30 – To form the tooth macrotexture, it is necessary to copy the vertical macrotexture (V-shaped grooves) and the horizontal macrotexture.
Image 31 – To form the microtexture of a tooth, it is necessary to copy the vertical microtexture and horizontal microtexture (perikymata).
Image 32 – To correct the angular lines after drawing them with a pencil, you can use a fine-grained bur No. 864 014 12F at an angle of 45 degrees to the tooth surface.
Image 33 – Correction of angular lines.
Image 34 – Correction of the vestibular contour.
Image 35 – The vestibular contour can be formed using a diamond bur No. 898 016 11ML sequentially in different thirds of the surface.
Image 36 – The contours of the embrasures on the cutting edge are usually formed with polishing discs (Sof-Lex or 3M discs in dark orange and light orange).
Image 37 – To form a vertical macrotexture (V-shaped grooves), you can use a fine-grained bur No. 864 014 12F, following the pencil lines.
Image 38 – To create a horizontal macrotexture, fine-grained bur No. 801 023 F can be used.
Image 39 – After forming the macrotexture details, you need to very carefully smooth the surface of the composite with rubber tools.
Image 40 – Fine-grained bur No. 853 008 3.5XF can be used to form horizontal microtexture (perikimates).
Image 41 – Once the microtexture details have been created, the surface of the composite should be smoothed with very soft rubber polishers such as Sof-Lex Diamond Spirals (3M).
Image 42 – To give the composite the shine of natural enamel, it is recommended to use fine-particle diamond pastes or aluminum oxide pastes. These pastes are used with a felt disc or soft brush to avoid scratching the surface of the composite material.
Image 43 – The final result of a direct veneer restoration using Filtek Supreme XTE, 3M, after all grinding and polishing steps. A high degree of polishing and luster of the surface of the composite material, similar to that in natural teeth, are very noticeable.
Image 44 – Final texture details.
Figure 45 – Clinical example of a simplified and predictable grinding and polishing sequence (case 1).
Figure 46 – Clinical example of a simplified and predictable grinding and polishing sequence (case 2).
Image 47 – Surface details of a direct veneer restoration after grinding and polishing.
Image 48 – Surface details of a direct veneer restoration after grinding and polishing.
Conclusion
The final step in creating direct restorations is grinding and polishing. However, this stage should be considered one of the most important to achieve true natural integration of the restoration with the adjacent teeth. To ensure that the chromatic stability and surface condition of the restoration is maintained well over time, it is essential to obtain a smooth and polished surface. However, for maximum long-term consistency of detail in form, texture and luminosity, periodic maintenance of the restoration is necessary, in which the condition of the surface and gloss is assessed. If necessary, the restoration should be re-polished. This procedure can be performed during periodic oral hygiene consultations with the patient. Composite materials have some limitations in durability, but using proper grinding and polishing techniques can extend the life of a composite restoration and closely replicate the surface of a natural tooth.
Source: forum.stomatologija.su
Possible consequences
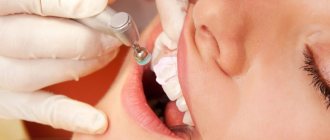
Despite the development of technology, polishing tooth enamel is still not the most pleasant procedure for which you should prepare in advance. To ensure the psychological and physical comfort of the patient, local anesthesia is used to eliminate pain.
It is also worth considering that after treatment, the sensitivity of the enamel increases, so the reaction to sudden temperature changes after the effect of painkillers wears off can be unpleasant. It is recommended to follow medical recommendations that prescribe a temporary exclusion of hot and iced foods and drinks from the diet, as well as a reduction in the amount of solid food, the consumption of which leads to an increase in mechanical stress on weakened enamel.
Polishing tools
The entire polishing process is carried out using several replaceable attachments on a drill. An abrasive paste is applied to the working surface, after which the enamel is exposed at high speeds.
The following attachments are available:
- in the form of a rubber bowl - for flat surfaces;
- a cone-shaped brush - for treating natural tubercles on distant teeth;
- strips - for hard-to-reach areas, including the interdental area.
Special pastes contain silica, silicate, zircon, xylitol and fluorine. They are distinguished by abrasiveness:
- high degree - eliminates dense stains;
- medium degree - polishing of small deposits;
- low degree - polishing of color irregularities;
- very low level - maximum softness to complete polishing.
Aftercare recommendations
The recommendations are mainly due to the fact that teeth become sensitive after the procedure. That is, you should avoid eating foods that seem very hot or cold.
It is also worth giving up too hard foods for a while. All this can be adjusted by trusting your own feelings regarding pain and comfort.
There are also specific tips. Thus, doctors recommend minimizing the consumption of foods that have a “coloring” effect. We are talking not only about certain berries, but also, above all, about tea and coffee.
This measure must be observed for two weeks in order to maintain the pleasant appearance of the cleaned enamel. You can at least switch to green tea at this time. You should also try to minimize smoking.
Reviews
Patients who have successfully completed the procedure note that the result debunks the myth about subsequent tooth decay. Moreover, they often write that teeth begin to look whiter and more beautiful.
Sometimes they complain of increased sensitivity, as a result of which they cannot live a normal life, for example, drink hot coffee in the morning. But a small percentage of negative reviews, most of which were the result of the dentist’s unprofessionalism, suggests that in general this procedure is useful and safe.
You can share your opinion in the comments to this article.
If you find an error, please select a piece of text and press Ctrl+Enter.
Tags: tooth enamel professional teeth cleaning ultrasonic teeth cleaning teeth cleaning
Did you like the article? stay tuned
Previous article
Biohorizon implants: features of installation and engraftment
Next article
What determines the service life of dental implants?
Advantages of polishing in Elite-Denta
Our clinic’s specialists polish teeth after treatment procedures, as well as as part of hygienic cleaning. We offer our patients the best conditions:
- experienced highly qualified doctors;
- affordable price and availability of benefits;
- advantageous offers and discounts;
- online registration for services;
- proximity to the center of Moscow and metro stations;
- work on high-tech equipment;
- use of modern materials;
- speed of the procedure;
- complete painlessness of grinding and polishing;
- no tissue injury during hygienic cleaning;
- if necessary, use local anesthesia.
We will provide high-quality polishing for your teeth, as a result of which you will get an attractive, radiant smile.
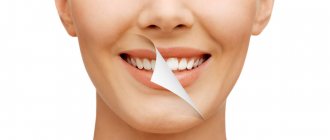
Polishing effect
After professional hygiene, the oral cavity is considered completely cleansed and will have high resistance to various pathogenic influences for some time. The final polishing stage has the following effects:
- noticeable teeth whitening;
- uniform enamel color due to the removal of all stubborn dirt;
- smooth, pleasant surface of the teeth;
- visible shine of enamel;
- further prevention of inflammation and plaque deposits;
- improving the quality of restoration;
- correction of tooth shape after filling;
- getting rid of unpleasant odor;
- restoration of the natural properties of enamel.
As a result of polishing, teeth gain the ability to cope with negative influences and food loads, as well as avoid oral infections.
How is the procedure performed?
Teeth polishing serves as the final step for both mechanical and ultrasonic cleaning. Also, a laser procedure is gaining increasing popularity, with which you can grind the enamel as accurately and painlessly as possible.
The entire process of caring for the surface of teeth includes several steps:
- Preparation. To prevent it from being difficult for the patient to keep his mouth open all the time, special mouth openers or retractors are used. All tools and attachments are also prepared in advance. If necessary, the oral cavity is cleaned with a stream of water, and then from the center towards the lateral teeth, dental floss is passed through the interdental space.
- Grinding. There is a consistent destruction of plaque, stone and other formations using nozzles and abrasives. Particular attention is paid to hard-to-reach places, subgingival pockets and 4, 5, 6, 7, 8 lower and upper teeth, since they bear the maximum chewing load. Next, the flat surfaces are ground, and then all teeth are disinfected.
- Polishing teeth after cleaning steps. Using a paste with a fine fraction, roughness is eliminated. The abrasive mixture is distributed using a special brush.
- Applying mineral paste or gel.
After polishing, the enamel absorbs fluoride well, so this stage restores the tissue and gets rid of new deposits for several months.
Hygienic tooth polishing is an important component of oral care, without which it is impossible to fully clean and maintain the enamel.
Polishing cost
The average price for teeth polishing in Moscow is determined by several factors:
- total cost of hygienic cleaning;
- required number of teeth for polishing - one tooth, upper or lower dentition or the entire oral cavity;
- type and method of grinding;
- manufacturer of tooth polishing pastes.
Moscow offers many different options for this service with a wide range of prices. Each dentistry has its own characteristics and equipment used.
At the Elite-Dent clinic you can polish your teeth at a competitive price. We constantly have special offers, promotions and discounts for our clients. The teeth polishing service is included in professional hygiene, which also includes the removal of tartar and plaque using the AirFlow technique. In addition, we offer a free consultation to all patients, during which an experienced doctor will examine, give recommendations and answer all questions.