- Types of products
- Ceramic inlay e max: main indications
- Contraindications for installing ceramic inlays
- Ceramic tooth inlay: advantages and disadvantages of products
- Manufacturing and installation stages
- Ceramic dental inlay: care features
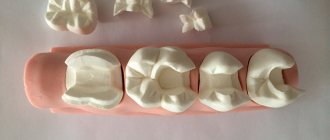
If it is necessary to carry out extensive restoration, they often resort not to filling material, but to ceramic inlays (onlays).
They are one of the best methods of dental restoration and provide high-quality results. Ceramic inlays are a microprosthesis that is fixed in the tooth cavity. Such orthopedic structures are characterized by high aesthetics and durability; they are completely identical to healthy enamel, due to which they have become widespread. The e max ceramic inlay is in particular demand; it can be installed in a reliable dental clinic “A-medic”. The company's pricing policy is loyal, the cost of the service starts from 15,000 rubles. Before installing a microprosthesis, dentists conduct an examination and diagnosis to identify possible contraindications. In dentistry, a ceramic inlay is installed in just 2 stages, which allows you to quickly make your smile more attractive. An individual approach to each patient is guaranteed.
What is a stump tab
A stump inlay in dentistry is a pin structure used for prosthetic purposes when it is impossible to restore the natural tissues of the coronal part of the tooth. The inlay is attached to the root part, protruding onto the visible surface of the tooth, forming a support for the artificial crown. The main condition for its use is the ideal health of the tissues and roots surrounding the unit. The stump tab, in contrast to the anchor pin, intended only to strengthen the tooth, consists of two parts: the lower one, installed in the canal, and the upper one, which gives the tooth its shape. The system rests on the surface of the tooth being restored and is able to evenly distribute the load on the root.
Principles of preparation for lithium disilicate structures
Up to 95% of lithium disilicate restorations (IPS E.max CAD/Press, Ivoclar Vivadent) in the posterior region demonstrate an optimal level of clinical effectiveness in the long term, making them one of the best choices for replacing defects in enamel and dentin structure. IPS E.max is a universal material that, in addition to excellent strength and resistance to fracture, also provides amazing aesthetic rehabilitation results: it can therefore be used equally successfully in both the anterior and posterior areas of the jaw in the form of complete or partial restorations . IPS E.max restorations can be cemented using both an adhesive protocol and composite cements. But it should be taken into account that the manufacture of this type of crowns and onlays requires the use of special preparation techniques, as well as adapted instruments developed specifically for such clinical purposes.
In the practice of a dentist, the formation of special sets of burs for a specific type of work helps to significantly save the time of a clinical appointment and reduces the likelihood of a possible risk of failure at the preparation stage. The sequence of burs in the physician-designed kit should correspond to the sequence of burs used during the clinical procedure. If a bur can be reused, it should be carefully sterilized and returned to its original work place, and tools that are not suitable for reuse should be discarded immediately - this way, there will never be any confusion about whether a particular bur is suitable for use. this manipulation, or is it from some other kit?
Preparation stage
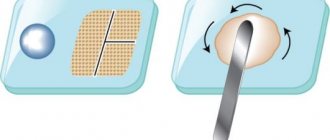
The new system for the preparation stage under IPS E.max (IPS E.max Restorative Preparation System) (photo 1), presented by Durabraze Diamonds, is equipped with all the necessary burs for preparing the core for any type of lithium disilicate restoration IPS E.max. Durabraze diamond burs are designed to provide the most adequate tissue removal, increase the cutting ability of the tool and, if possible, extend its service life.
Photo 1. Set for preparation for IPS E.max structures.
Preparation of chewing teeth for complete restorations is carried out with the formation of a ledge similar to a modified shoulder (with a rounded internal corner) and the deliberate removal of tissue from the occlusal surface by 1.5 mm, from the axial walls by 1 mm, and by 1.5 mm in the center area stump and upper occlusal third of the axial walls (photo 2). To create preparation grooves on the occlusal surface and in the cusp area, it is convenient to use WDL1.5 burs (photo 3).
Photo 2. Preparation for full crowns.
Photo 3. Marking grooves on the occlusal surface.
Peter Brasseler coarse 016 diamond burs (845KR) are used to remove tissue from the occlusal side to the level of the guide grooves; the same burs are used to form guide grooves on the buccal and lingual sides of the axial walls, prepare proximal surfaces and create an adequate gingival margin (photo 4).
Photo 4. Marking burs in the area of the axial walls.
The level of preparation from the occlusal surface should be checked not only visually, but also using a silicone bite key obtained before starting the preparation procedure. After performing the above procedures, the surface of the stump is polished and the formed edges are rounded using a fine diamond polishing bur BR8847KR. The polished preparation surface improves the accuracy of traditional and digital impressions and thus results in more accurate and precise final restorations.
To prepare for onlay-type inlays in the area of chewing teeth, the same principles and tools are used as for preparing the stump for full crowns (photos 5 - 6). In cases where the abutment tooth has a low clinical crown or the patient is unable to open the mouth wide, the dentist can successfully use the 845KR 016 bur to form a modified ledge and adequate tissue reduction. The area of each cusp that will be covered with an onlay should be reduced by 1. 5 mm from the chewing surface, by 1 mm in the area of the gingival margin, and by 1.5 mm in the area of the middle and upper third of the stump. In cases of indications for the manufacture of inlays of the inlay type, the doctor must create a sufficient cavity depth of at least 1 mm, and a corresponding width of 1 to 1.5 mm. The WDL1.0 bur can be used to create guide grooves from the occlusal surface, and the gingival area is reduced by approximately 1.0 mm to create an adequate shoulder size. As with all ceramic restorations, all edges and internal corners must be smoothed and polished.
Photo 5. Preparation for onlay-type inlays.
Photo 6. Preparation for onlay and inlay inlays.
The Brasseler IPS E.max preparation system is ideal for preparing the anterior tooth area for esthetic restorations. It is equipped with a range of RWEXT, RWCONV and RWMIN burs designed to form guide grooves into the vestibular sides of the tooth. When making full crowns in the frontal area, the reduction of hard tissues from the cutting edge should be carried out by 1.5 mm, on the front side - by 1.2 mm, and by 1 mm in the area of the gingival edge (photo 7). The RWDL1.5 bur is ideal for forming guide grooves from the cutting edge (photo 8), after which the RWEXT bur can be used to form grooves in the middle third of the stump, positioning it parallel to the plane of the cutting edge.
Photo 7. Preparation of anterior teeth.
Photo 8. Marking grooves in the area of the incisal edge.
The RWEXT bur is also suitable for creating guide grooves at the gingival margin and should be positioned parallel to the gingival third of the tooth. The cutting end of this unique instrument can also be used to create a deep chamfer-type shoulder in the subgingival area if deemed clinically appropriate by the dentist. Considering the shape of the central teeth, adequate tissue reduction from the vestibular surface is a rather difficult clinical task (photo 9). To form a marking groove, you can successfully use the RWDL1.0 bur, which provides a groove with a depth of exactly 1 mm. The preparation on the proximal and vestibular sides is completed using a BR6847KR diamond bur, and on the lingual side with a BR6379.023 diamond bur. After preparation, the stump is smoothed and polished using a BR8847KR bur.
Photo 9. Reduction of tissue from the lingual surface.
The preparation algorithm for IPS E.max veneers is unique (photo 10), which depends on aesthetic parameters and conditions for performing the restoration, color and structural features of problem teeth.
Photo 10. Preparation for veneers.
Tissue reduction on the vestibular side can vary from 0.3 to 0.8 mm at the gingival margin. The minimum volume of preparation ensures the formation of a sufficient area of enamel suitable for the stage of fixation of aesthetic restoration. On the other hand, increasing the depth of preparation provides opportunities for better aesthetic correction of the smile, but negatively affects the retention rates of the structure. Veneers in the frontal area can be limited only to the vestibular surfaces of the teeth, but in some cases they can also extend into the area of contact surfaces (photo 11).
Photo 11. Preparation for veneers.
The amount of preparation of contact surfaces depends on the presence of interdental caries, class III restorations, or the patient’s desire to cover the “black triangles” in the anterior area. In this case, the contours of the preparation of the contact surfaces can also extend to the lingual side of the tooth, thus providing a better level of retention. The situation is similar with the cutting edge: it can either be covered with a veneer, or the restoration can end in the middle of the thickness of the cutting edge - it all depends on the decision of the dentist and the desire of the patient. If they want to visually lengthen a tooth, change the position or shape of the incisal edge, doctors can expand the contours of the preparation - technicians need to take into account the transparency of the incisal edge when applying enamel, as well as the need to imitate mamelons to maximize the imitation of the natural appearance of the restoration. In cases where the natural parameters of the cutting edge are optimal, the preparation profile reaches the middle of the structure, which is subsequently covered with veneer.
But, as practice shows, the production of veneers is often carried out to change the position of the teeth, the shape or position of the cutting edge, therefore, to ensure minimal tissue reduction and sufficient space for ceramics, the principle of direct modeling is used. The models are sent to the laboratory, where wax reproductions are made from them. To obtain a model from a wax reproduction, a silicone matrix is used. The teeth are spot-etched, and the silicone matrix is filled with bis-acrylic material, after which it is fitted to the patient’s teeth. After the bis-acrylic filler has completely hardened, the silicone matrix is removed from the oral cavity, and its remains from the gingival margin are cleaned using a plastic instrument. Subsequently, preparation is carried out with control on a bis-acrylic model.
As for preparations for full crowns, a RWDL1.5 bur is used to form guide grooves in the incisal area. To create similar marking grooves on the labial side, different RWMIN, RWCONV or RWEXT burs can be used, depending on the required amount of preparation. Unlike preparation for crowns, when preparing a stump for veneers, you cannot simply remove hard tissue in an almost straight-line direction from the incisal edge to the gum area; preparation should be carried out in three different planes - incisal, median and gingival - relative to the vestibular surface of the tooth in order to preserve it natural curvature.
The final preparation is carried out with a modified 012 or 16 bur, depending on the amount of tissue reduction required. To ensure adequate aesthetic parameters, the preparation contour of the proximal surfaces in the gingival area should be more lingual than in the incisal area. As with other preparation algorithms, adapted finishing polishers are used to round teeth and polish surfaces. In order to avoid excessive additional uncontrolled tissue reduction during finishing processing, the author of the article suggests using the reverse torque of the rotary tool and a low speed (20,000 rpm) in order to be able to fully control the adequacy of the manipulation.
conclusions
Strict implementation of methodological preparation algorithms, as well as the use of adapted sets of burs, provide the most effective results in preparing teeth for different types of aesthetic restorations. Thus, this procedure becomes more predictable, accurate and accurate, which ensures the receipt of adequate orthopedic structures and saves the clinician’s time.
Posted by Lee Ann Brady, DMD
Manufacturing technology of the stump tab
- The method of layering ceramics. After receiving the impressions, a refractory model is made, a ceramic pin is tightly installed in the channel, ceramic is applied to it, and firing is performed. In the process of applying ceramic layers, it is possible to choose different colors and shades of the material, dyes and modifiers.
- Production of ceramics from tablet molds by pressing. An inlay is modeled from wax, and sprues are installed in the direction of the ceramic flow. Using a silicone ring, investment material is introduced and a limiter is placed. Pressing is carried out in an oven equipped with a microprocessor control system. The resulting product after pressing and casting is a solid single crystal, the abrasion of which is comparable to the natural abrasion of hard dental tissues.
- Manufacturing using CAD/CAM method. Allows you to form prostheses and parts that match the implant, abutment, and the shape of the tooth stump. The unit is scanned in the mouth or on a model, 3D modeling is carried out using a special program, the information received is transferred to a milling machine, which mills the product under computer control. The method is precise and complex, requiring high costs for professional training of personnel to operate the equipment.
- Injection molding method for manufacturing a stump insert. Casting a working model from plaster/polyurethane, selecting an ashless pin similar to the root canal, applying silicone varnish to the root. The pin is inserted into the canal and modeling is carried out with ashless plastic/wax. After a control check, the cast stump insert is removed and transferred to a metal casting. The method is technologically easy, low-cost, requires a minimum of material costs, but is very sensitive to the quality of casting. With strict adherence to all norms and rules, reliable and high-quality microprostheses are obtained.
What is tooth preparation
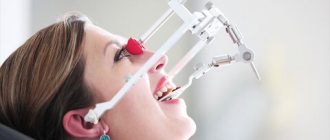
Preparation (turning) is one of the stages in orthopedic treatment, which involves grinding down hard tissues to level their surface.
Previously, this procedure was extremely painful and quite lengthy. Modern instruments and advanced local anesthetics have significantly reduced the time of manipulation and made them absolutely painless.
Is it possible to do without turning?
Many patients are concerned about the question: is it possible to do without the preparation process and install a crown or prosthesis on a tooth in an intact state? Unfortunately, despite all the advances in dentistry, it is impossible to skip this stage of treatment.
In order for the crown to be securely fixed on the tooth, they must fit together as accurately as possible. But the natural tooth shape is not ideal; the side walls of the teeth have a convex shape, which excludes the possibility of creating a crown. During the grinding process, part of the enamel is ground down, as a result of which the tooth receives the correct geometric shape, onto which an orthodontic structure can easily be placed. In addition, any crown has its own thickness, which must be taken into account so that it does not interfere with the oral cavity and does not cause discomfort when talking and eating.
During preparation, the dentist removes all tissues affected by caries from the surface of the teeth. This is necessary so that complications do not develop after prosthetics - secondary caries and destruction of the supporting tooth.
How to grind correctly
If pulpless (“dead”) teeth are being prepared, there is no need for anesthesia, except in cases where the use of a special thread is required to move the gums back. If the grinding procedure is carried out on vital (“living”) teeth, then in order not to hurt the patient, anesthesia is required.
When preparing, it is imperative to take into account the anatomical features of various teeth and possible reactions of soft tissues. It is advisable to conduct an X-ray examination of the patient before the procedure in order to have an idea of the structure and places where the opening of the dental cavity is most likely.
If your teeth and gums hurt after grinding: reasons and what to do
The turning procedure itself does not cause any pain when adequate anesthesia is used. But after the effect of the painkiller wears off, unpleasant and even painful sensations may occur both in the tooth itself and in the surrounding gum.
Possible reasons:
- If the preparation is performed on a vital tooth, then it is possible that too thin a layer of dense tissue is left above the pulp containing nerves and blood vessels and the ground tooth thus reacts not only to the intake of sour or cold food, but also to touch. In such cases, installation of a temporary crown or additional cementation of the thinned area is indicated.
- To carry out shoulder grinding, the doctor needs a good overview of the working area, especially if the manipulations are carried out deeper than the gingival margin. To do this, gum retention is carried out - moving its edge back using a special thread. This manipulation can cause compression of the soft tissues, swelling and pain. Normally, such sensations go away on their own within 1-2 days.
- If enough time has passed after grinding, then the occurrence of pain in the tooth may indicate the development of pulpitis or periodontitis. This symptom is dangerous and requires urgent attention to a specialist.
Manufacturing methods
- Straight. It is characterized by its low cost, ease of implementation, and does not require the presence of fire-resistant models or impression materials. With the direct protocol, the future core inlay is modeled in the oral cavity, and then dental laboratory specialists replace the wax with the working restoration material. Disadvantages: insufficient visibility of the surgical field, risks of thermal injuries to the mucous membrane, large time expenditure for the dentist.
- Indirect (indirect). It is used for all types of defects; production takes place in two stages: obtaining an impression plus obtaining a model.
Preparation for inlays: principles and rules
Inlays are partial dentures and are used to replace large defects in dental tissue.
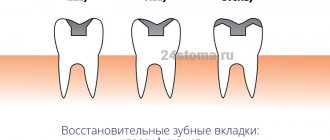
Depending on the form, there are the following types of tabs:
- Inlay (inlay) - minimally invasive, since they do not affect the tubercles of the tooth;
- Onlay (onley) - serve to replace the internal slopes of the dental tubercles;
- Overlay - cover the entire volume of at least one tubercle;
- Pinlay (pinlay) - cover all dental cusps and have a special pin in their design - pin;
- stump inlays are a metal pin used in cases of severe destruction of tooth tissue and serving as a support for the crown.
Depending on the materials used, the inlays can be ceramic, metal or reinforced composite.
The main feature of preparing teeth for inlays is the need to create parallel side walls near the cavity for proper insertion of the finished structure, as well as to create sufficient depth for reliable fixation of the element.
Basic principles of turning for inlays:
- The prepared cavity must have an optimal shape for the smooth insertion and removal of the prosthesis. In this case, it is necessary to strive for maximum parallelism of the vertical walls. We allow only a slight angle of their deviation.
- The angle of transition of the cavity walls to the bottom should approach a straight line. The relationship of all walls should contribute to the uniform distribution of chewing pressure and maximum stability of the inlay.
- When forming the day, it is necessary to take into account that a minimum layer of tissue should remain above the pulp to ensure its protection from external factors. In adults, this value is 0.6 mm, and in children and adolescents - 1.4 mm.
- When forming complex cavities, additional fixation points should be formed to allow the inlay to be firmly fixed.
- When forming a cavity for metal inlays, it is necessary to create a bevel at the level of the enamel with a width of at least 0.5 mm and at an angle of 45°, which will ensure more accurate marginal contact of the prosthesis and tooth tissue.
- In the manufacture of metal-free structures, the presence of a bevel is contraindicated due to the fragility of materials with a small thickness.
Indications for installation
- destruction of the crown part of the tooth;
- periodontal diseases (splinting);
- defects in the shape, position of the unit, supragingival area;
- There is no way to put a pin with a filling. For example, if the chewing teeth are destroyed.
Contraindications for installing a post-core restoration on a pin
: caries, cysts, damage or absence of roots, gum disease, periodontal disease, pathological mobility of the dentition, allergies to the alloys from which the structure is made.
We offer
:
- single crowns;
- veneers, lumineers;
- bridge-like devices;
- implant-supported restoration;
- systems with stump pin system.
Ceramic inlay e max: main indications
Many people mistakenly believe that ceramic inlays are a type of regular filling. In fact, they belong to the category of high-tech microprostheses. Its parameters and characteristics significantly exceed any, even the most modern and high-quality filling material. Among the main indications for installing ceramic inlays are:
- destruction of the coronal part by 30% or more;
- preparing a molar or premolar for the installation of permanent orthopedic structures, for example, bridges;
- increased abrasion of enamel;
- the presence of a large cavity that was formed as a result of an advanced carious process;
- increased sensitivity of molars or premolars to external factors;
- mechanical damage.
If, after fixing the orthopedic structure, pronounced painful sensations occur, you should not delay your visit to the dentist. Most often, pain and discomfort are a sign that the product was installed incorrectly. To avoid such situations, treatment should be carried out only in trusted dental clinics.
Advantages of stump inlays
Compared to other post systems, the stump post is much stronger. The inlay distributes the load more evenly and fits tightly to the remaining teeth, which prevents the formation of cracks and the development of caries.
Other advantages include the possibility
:
- regenerate destroyed/lost units;
- support natural teeth with bulk fillings;
- remove increased abrasion of tooth enamel;
- restore anatomical form/functionality;
- align curvature, maintain aesthetics;
- make prosthetics on implants.
How does an inlay differ from a filling?
The filling is made of a plastic material that hardens and takes the desired shape. It is made and installed right in the dentist's office in one appointment. However, a filling will not help when the tooth is severely damaged. In this case, you will need a ceramic inlay. It is made in the laboratory using an individual impression. It not only closes the resulting cavity, but also exactly repeats the shape of the destroyed area of the crown.
Advantages over fillings:
- Higher efficiency
. It is possible to restore a severely damaged tooth. A filling is suitable only if the cavity occupies less than a quarter of the crown, and an inlay can restore from 25 to 60%; - Naturalness
. The inlay imitates the anatomical shape of the chewing surface. It is almost invisible, while the filling can be seen; - Higher strength
. Microprostheses do not develop cracks. A filling of this size would quickly crumble, so it is not suitable for restoring extensive damage; - Durability
. The tab will last 5–7 years. At the same time, it will remain unchanged and will not lose its original characteristics; - Ensuring the prevention of secondary caries
. Sometimes the filling can become infected again. The insert fits very tightly and does not shrink over time, so this risk is eliminated; - Color fastness
. The fillings have a porous structure, so they are easily stained by tea, coffee, and tobacco. Ceramics are not subject to color changes.
Flaws:
- They cost more;
- They take longer to produce. The filling can be placed in one visit to the dentist. And to install the tab, you will need 2 visits with a break for the manufacture of a microprosthesis in the laboratory.
Comparison with classic pins
Standard pins - pros:
- gentle tissue preparation;
- the ability to conduct therapy in one session;
- low price.
Minuses:
- the coronal and intraradicular segments of the restoration may become separated because there is no chemical bond between them;
- in the case of active rods, there is a risk of a wedging effect during the screwing process;
- the absence of a base in the structure leads to a sharp increase in the propping load on the root during operation;
Pros:
- the stump and the pin are cast from identical material and connected, which 100% eliminates the possibility of their separation;
- slight wedging effect during cementation of the stump inlay;
- minimizing disjoining pressure, since the chewing load is transferred to the walls of the root, along its axis, to the rod.
Stump pin inlays can be used when the destruction index of the occlusal surface of a unit is more than 60-100% (standard pins - 50-60%). Such inlays are durable and guarantee the reliability of the structure.
Our dentistry offers installation of several types of core microprostheses
:
- serve within 5-25 years;
- reliability of crown fixation;
- excellent strength;
- simplification of subsequent fastening of bridges;
- the ability to work with any degree of destruction, restoration of bite;
- lack of access for pathogens. No inflammatory processes;
- simple replacement of the prosthesis if necessary.
Preparation methods: ultrasonic, laser, tunnel, chemical
There are several methods that allow you to prepare teeth; let’s look at each of them in more detail.
Ultrasonic preparation
The principle of operation of devices of this type is that the grinding of teeth occurs due to high-frequency vibration of the instruments under the influence of ultrasound.
Advantages:
- working tips exert minimal pressure on tooth tissue;
- during operation, a small amount of heat is released and no significant heating of enamel and dentin occurs;
- the procedure is painless;
- Ultrasound does not cause microcracks and chips on the walls of the pin;
- there is no negative effect on pulp tissue.
Laser preparation
Pulsed lasers are used for grinding teeth, the effect of which is that under the laser beam, water in the dental tissues is greatly heated. This leads to microscopic damage to the integrity of the enamel or dentin, pieces of which are immediately cooled and removed using a special water-air mixture.
Advantages:
- Laser equipment operates silently.
- High safety of the procedure, since there are no elements rotating at high speed.
- Low heating of dental tissues.
- Turning speed.
- Complete absence of pain.
- The edges of the pin have no chips or cracks.
- Since the procedure is non-contact, the possibility of infection is minimized.
»
Tunnel preparation
Today, turbine dental units are used for grinding teeth, with the ability to adjust the operating speed, and diamond or metal tips. The result of the work directly depends on the quality of the equipment, since worn-out tools cause significant overheating of the tissue, which significantly increases the risk of destruction.
When grinding teeth using the tunnel method, they try to leave as much of their own dental tissue as possible. The main advantage of the technique is the ability to clearly control the size of the removed tissue layer and clearly predict the result.
Flaws:
- possible heating of the enamel and resulting pain with insufficient anesthesia;
- If the technique is violated, soft tissue injury may occur;
- When using low-quality instruments, there is a high risk of microchips and cracks in hard dental tissues.
Air abrasive preparation
When using this method, instead of a rotating drill and drill, an air mixture with abrasive powder is used, which is supplied under fairly high pressure. When contacted with enamel or dentin, this combination causes minor destruction and removal of tooth dust.
Advantages of the technique:
- simplicity and high speed of all manipulations;
- no heating of tissues and no pain;
- the absence of vibration has a positive effect on pulp tissue during the preparation of vital teeth;
- maintaining the maximum amount of dental volume.
Chemical preparation
The chemical treatment method involves the use of active substances (most often acids) that soften enamel and dentin, followed by removal of damaged tissue. The disadvantage of the procedure is the need for prolonged exposure to reagents (sometimes up to half an hour).
Advantages of the chemical method:
- no thermal damage to teeth;
- there is no need for pain relief;
- there are no small chips or microcracks in the enamel;
- psychological comfort for the patient due to the lack of sound of a working drill.
Classification of stump inlays
| View | Description | |
| By installation method | ||
| Cast | Manufactured under high pressure and temperature. The non-separable model consists of a main part and pins for fixation. Can be replaced over time | |
| Collapsible | Designed for two to four channels. Similar in design to cast ones, only some pins are made removable. This is due to the fact that channels do not always have a symmetrical structure. Comes with a lifetime warranty | |
| Based on base material | ||
| Metal | These can be cobalt-chrome, precious metals and their alloys. They are characterized by increased reliability. Disadvantages include an unaesthetic appearance, which is why they are most often placed behind the smile line | |
| All-ceramic | Made from zirconium dioxide or pressed ceramics. Zirconium is as durable as its metal counterparts. Ceramic inlays are aesthetically pleasing and natural-looking, which is why they are used for front teeth. All-ceramic ones are produced automatically. This ensures maximum compliance with the bite | |
| Metal-ceramic | Products made from metal ceramics are of average quality and affordable price. Due to the difference in thermal expansion of metal and ceramics, there is a high risk of falling out | |
| Composites | Composite inlays are rarely used due to their low durability | |
Important
: It is desirable that the materials of the pin and crown parts of the core structure coincide. For example, if the core inlay is metal and the crown is ceramic, then the metal will be translucent.
How are tabs used?
- in the form of an independent design that allows you to restore the shape, function and aesthetics of previously unsuitable crowns with IROPS indicators of 0.3–0.6, that is, in the presence of: caries, if filling turns out to be ineffective or cannot be performed;
- tissue damage of a non-carious nature, for example, with wedge-shaped defects or with increased abrasion.
Multi-channel and single-channel tabs
When treating a multi-rooted tooth, the doctor must make a decision: to make a collapsible or solid-cast core microprosthesis. If the root canals run parallel, solid blanks are used. Before choosing one of the various options for inlays, the patient is diagnosed - they take pictures and CT scans. Computed tomography helps to visualize the condition of the root segment, the configuration of the canals, and the presence of bone and periodontal diseases that require treatment. A multi-root microprosthesis is a good option because it creates uniform pressure on the entire tooth while being held in several canals at the same time. A crown with such a base can be used to mount a bridge restoration without the risk of destroying or damaging the tooth.
Requirements of orthopedic dentistry for the use of core inlays:
- the root canal must have good patency over a length identical to the length of the pin;
- absence of purulent-inflammatory processes in the root zone;
- the walls must be of sufficient thickness (2 mm or more) to resist the chewing load transmitted through the stump structure, the protruding area must not be affected by caries;
- the stump should not be covered by the gum, otherwise gingivectomy is indicated;
- apical tissues should not have manifestations of chronic/acute inflammation.
Types of ledges during preparation
Preparation of teeth with a ledge is a prerequisite for reliable fixation of the prosthetic structure in the oral cavity.
The most common methods of grinding teeth with a ledge:
- Knife -edge . The most commonly used type. Its width is only 0.3-0.4 mm. This is the best option for preparing inclined teeth and for solid metal crowns.
- Rounded grooved ledge ( Chamfer) . With a width of 0.8-1.2 mm, it allows maximum preservation of dental tissue. It is a classic option for metal-ceramic prosthetics.
- Shoulder ledge . The most uneconomical type with a width of 2 mm, requiring depulpation. However, it has the highest aesthetic characteristics and allows the crowns to be secured most firmly.
Grinding teeth without a shoulder is a serious mistake by the dentist, since the prosthetic crown will not be able to fit tightly to the tooth surface. And this will greatly complicate the care of dentures and increase the risk of developing caries.
Stages of manufacturing and installation of dental prostheses
We work in several stages
:
- Preparation. We remove the carious area, perform a filling, take an x-ray for verification, and form a cavity.
- We unseal the roots by half or one third, giving them a taper and width. It is also important to choose the optimal tab option.
- We take an impression of both jaws and cast it from plaster in a dental laboratory. It is important that the microprosthesis corresponds to the antagonist organ.
- We scan the cavity and carry out modeling on a computer.
- We send the task to an automated milling machine, which produces the product.
- We burn the workpiece in a special oven.
- We treat the area with an antiseptic and fix the fat-free microprosthesis with cement.
- Trying on and selecting a crown, installing a finished core inlay.
How stump inlays are made: an overview of the main stages
Stump inlays are made individually for each patient. Treatment begins with an examination of the patient and consultation with two specialists – a general dentist and an orthopedic dentist.
Before an impression is taken from the tooth, according to which a stump insert will be made, high-quality sanitation of the oral cavity is carried out, and all diseases of the teeth and gums diagnosed during the examination are treated. The damaged tooth is treated: the nerve (pulp) is removed from it, and the canals are filled. This is where the work of the dentist-therapist ends and the orthopedist begins to care for the patient.
Further treatment will proceed according to the following scheme:
- The prosthetist will correctly prepare the tooth for installation of the stump inlay and select its type.
- When choosing the type of stump tab, the material of its manufacture and the type of tab (single-root or multi-root, cast or collapsible stump tab) are determined.
- Then the doctor will make an impression of the patient’s jaws, which will be sent to the dental laboratory, where a stump inlay will be made from the impression taken.
- Based on the impression, a model of the stump inlay is first made, and then a permanent structure is made from the selected material.
- The dental technician passes the finished stump inlay to the orthopedist.
After the stump inlay is ready, the patient is invited to the prosthetist’s office and the doctor installs the stump inlay in the tooth canals. A temporary prosthesis is put on the tab and a break is taken in the treatment until the crown is made, which the doctor fixes on the stump tab.
Complications and errors
Errors in the manufacture of core inlays are divided into two groups: those associated with the work of the orthopedic dentist and the actions of the dental technician.
Clinical:
- unsealing of the canal to an unsatisfactory amount;
- root perforation during teeth grinding;
- giving an inadequate shape to the channel, which can lead to de-cementing of the structure;
- errors when taking impressions.
Laboratory:
- poor-quality casting when using the casting method;
- non-compliance with processing standards during the pressing method;
- violation of the firing regime when applying ceramic layers.
Quality criteria for core restoration: high aesthetic level, reliable fixation, long service life, uniform distribution of pressure when pressed.
Ceramic tooth inlay: pros and cons
- Good functionality. The inlay not only accurately copies the shape of the tooth, but also allows you to completely restore chewing function
- Great aesthetics. Ceramics is the best material for aesthetic prosthetics
- Safety. Ceramics is a bioinert material that does not cause allergies.
- Ceramic inlays do not stain or fade over time
- Long service life. If you choose a dental inlay instead of a filling, you can expect it to last at least 10 years
- May not be used in all cases (see contraindications)
- Fairly high price
- Sometimes installing a crown will be a more reliable solution in the future
Hygienic oral care
After installing the microprosthesis, 10-14 days pass before fixing the bridge or crown. During this period, the prosthesis requires special careful care:
- chewing food with the opposite side of the jaw;
- exclude solid foods;
- teeth are brushed as standard;
- The oral cavity is rinsed with an antiseptic solution after each meal;
- the gums are treated with an anti-inflammatory agent.
Stump inlays do not require specific care. It is enough to regularly brush your teeth, undergo an examination by a doctor, and undergo a professional sanitation procedure. To clean crowns, it is recommended to use soft brushes, dental floss, and special brushes. With proper care and following the recommendations of dentists, the stump insert will serve you for many years.
Ceramic dental inlay: care features
The ceramic inlay and onlay do not require complex care. You need to care for your teeth like you would for regular teeth - brush twice a day, use floss and mouth rinses after each meal. It is worth noting that ceramic inlays, due to their physical properties, do not require additional care (unlike light fillings) - professional cleaning.
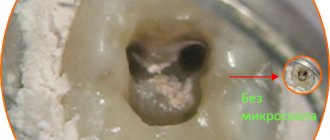
In order to promptly detect leaks in the Emax tab, you need to regularly visit the dentist’s office (once every six months). When a dark stripe appears, there is a high probability that pathogenic microorganisms have begun to penetrate under the ceramic inlay, which provoke the development of a carious process. On average, the service life of ceramic structures is about 7-8 years. Subject to all rules and hygiene standards, as well as the absence of increased stress, they can last several years longer.
You can install a ceramic inlay in Moscow at the reliable A-Medic clinic. Qualified specialists with extensive experience work here, which guarantees a positive result. The orthopedic design is no different from natural teeth and can last for many years. In the event that there are contraindications to the installation of this product, A-Medic dentists will be able to select another method of tooth restoration.
Why us
- it doesn’t hurt: during installation we use different types of anesthesia, depending on the patient’s individual parameters;
- it’s fast: treatment will require 2-3 visits;
- it’s reliable: we provide a 3-year warranty;
- it’s convenient: we work with any materials – gold, zirconium dioxide, porcelain;
- it's safe: we have our own dental laboratory. We use equipment from European brands, which guarantees high accuracy and safety of products.
Restore a tooth that seemed hopeless - install a core tab at an attractive price at Dr. Razumenko’s dentistry in Moscow!
Features of preparation in children
Preparation of primary primary teeth in children is a serious problem in dentistry. Young patients are the most difficult group among dental office visitors due to the high prevalence of phobia of the sound and sight of a rotating drill. In addition, baby teeth have a number of anatomical features that do not allow “adult” manipulations.
Therefore, doctors are looking for alternative methods for preparing teeth for caries in childhood.
The most promising method in this case is considered to be chemical preparation, which does not cause negative sensations even in the smallest children, but at the same time allows for sufficient quality treatment of the carious cavity.
Prices for installing a stump tab
To find out the cost of a stump tab, sign up for a consultation at Dr. Razumenko’s dental clinic. To do this, fill out an application on the website or call: 8 (495) 380-01-38.
| Code no. | NAME OF PROCEDURES | Unit of measurement | Cost, rub. |
| 712 | Fixation of restoration with glass ionomer cement | 1 500,00 | |
| 735 | Single-root post-core inlay CAD/CAM | 7 000,00 | |
| 736 | Multi-root post stump inlay | 8 000,00 | |
| 737 | Single-root/multi-root post stump tab, collapsible | 9 000,00 | |
| 738 | Zirconium pin insert | 11 000,00 | |
| 739 | Cast pin insert with attachment | 12 000,00 |
* The prices indicated on the website are not a public offer. The exact cost of treatment can only be determined at an appointment with a doctor.
Prices for treatment in Moscow full price list
Share on social media networks:
Article Expert:
Razumenko Evgeniy Gennadievich
Chief physician and founder of the dental clinic. He has been working in aesthetic dentistry for many years, restoring teeth of any complexity with ceramic and composite restorations. Winner of competitions in aesthetic dentistry. Applies CAD/CAM technologies in prosthetics.
Work experience 22 years
We recommend that you read
Clasp dentures
Metal-ceramic crowns
Nylon dentures
Veneers