1001
Biologically passive thermoplastics of medical purity are increasingly being used for the manufacture of artificial organs and individual body structures.
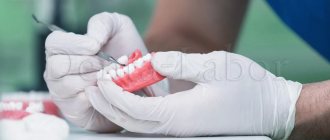
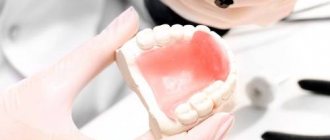
The most famous and most popular thermoplastic for creating the basis for removable dentures is polyamide, patented under the Deflex brand.
Polyamide is developed by the Argentine company NUTEN as a material for the manufacture of the base of removable structures.
Features of the material
Deflex is a polyamide with a high elasticity index, which allows this material to be classified as a semi-rigid thermoplastic.
This feature gives polyamide significant advantages, and puts prostheses based on it an order of magnitude higher than nylon analogues in many characteristics.
Thus, the material has increased temperature stability , and reacts completely differently to temperature changes. Deflex, as is usually the case with nylon, does not harden when eating cold foods and does not soften when eating hot foods.
The simultaneous combination of the maximum density of polyamide with its minimum porosity provides high levels of strength, stability and durability of prosthetic products based on it.
And the low absorption of all kinds of liquids blocks the formation and fixation of bacterial plaque on the surface , the appearance of odor, and prevents distortion of the color of the structure.
The increased strength and elasticity of the material makes it possible to make a device whose thickness will be at least half that of acrylic, which guarantees it comfort when wearing, lightness, and preservation of the patient’s natural phonetics.
In addition, with such characteristics it was possible to distribute the chewing load evenly, prevent the formation of a shoulder load on the supporting elements and ensure the vertical stability of the entire structure.
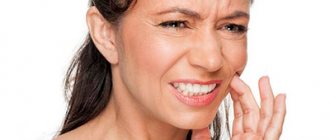
Polyamide is a hypoallergenic material , which means it is ideal for patients who are prone to all kinds of allergic manifestations. Deflex is also distinguished by its natural transparency, which makes products based on it completely invisible.
Important! A unique combination of creation technology and material allows us to produce a functional prosthesis with ideal aesthetics. Such products comply with the Kennedy classification, combining 5 main functional properties - stability, support, retention, bending and occlusion.
The first signs of an allergy to dentures and ways to get rid of the problem.
Visit here to learn more about contraindications for removable dentures.
At this address https://www.vash-dentist.ru/protezirovanie/semnyie-p/vidyi-klammerov.html we will consider the types of retaining clasps.
A little about the manufacturer
Dental Import Export Company Dentimex was founded in the Netherlands in 1938. The company began its activities with the production of removable products made from acrylic materials.
A gradual increase in the product range, expansion of production capacity and the conquest of new markets led to the reorganization of the manufacturer and its focus on the production of high-quality innovative premium materials for the manufacture of dental structures.
Currently, Vertex-Dental is known in more than 75 countries around the world. It is engaged in the production and distribution of various components for the manufacture of structures:
- hot and cold curing plastics;
- insulating liquids;
- polishing materials.
Particularly popular in orthopedic dentistry is the monomer-free plastic Vertex Thermosens, which makes it possible to produce systems for patients with increased sensitivity and susceptibility to allergic reactions.
Areas of use
The area of use of polyamide prostheses is quite wide. It is appropriate to install such products in patients with the following indications:
- minor defects in the dentition, when 1-2 elements are missing;
- edentia, i.e. not a single tooth survived;
- allergic reaction to metal alloys.
Deflex dentures are also successfully used for patients suffering from periodontal disease or periodontitis, since there are no conditions for loosening of supporting teeth.
It is also advisable to recommend them to those for whom preparation is strictly contraindicated.
Polyamide structures are ideal for people who have traumatic professions, for example, firefighters, police officers, athletes, etc., since it is almost impossible to break them.
It is also recommended to choose Deflex for people who, due to certain restrictions, are contraindicated for implantation.
Such pathological conditions include:
- heart failure;
- thyroid problems;
- immune system diseases;
- hepatitis;
- diabetes;
- blood diseases.
Professional approach to solving complex dental problems
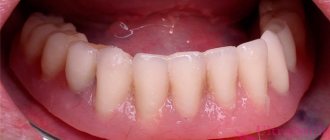
We especially recommend Deflex dentures to patients who suffer from gum disease and allergic reactions. Such structures can replace one or several teeth; moreover, they can be used to restore a complete row of teeth.
When turning to Dentium, many patients who have lost almost all their teeth refuse to have fully removable dentures installed. The use of Deflex structures can effectively solve this problem, since they only need to be removed for cleaning during hygiene procedures. Caring for removable teeth is simple – all you need to do is use high-quality toothpaste and a soft-bristle brush.
If you have lost one or more teeth, contact Dentium immediately and we will find an effective solution to the problem. Our dentures are distinguished not only by their excellent quality and durability, but also by their natural appearance, so you will not experience psychological discomfort even with full prosthetics.
Contraindications
Important! Removable devices, including polyamide ones, have virtually no contraindications for use.
They should not be worn by people suffering from:
- pathologies of bone tissue;
- mental disorders;
- oncology;
- acute or chronic inflammatory diseases in the body.
It is also not recommended to install them if you are depressed, pregnant, drug addicted, or undergoing radiation therapy.
Why dentures may become loose and what specialists are doing.
In this publication you will find detailed information on the adequate selection of abutment teeth.
Here https://www.vash-dentist.ru/protezirovanie/semnyie-p/raznovidnosti-bazisov-zubnyih.html all the most important things about creating the basis of a partial removable denture.
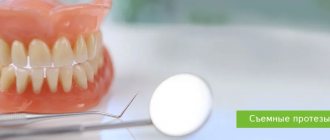
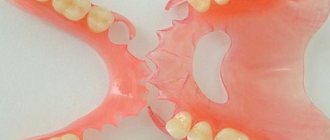
Disadvantages of a nylon prosthesis
Like any other dental device, soft nylon dentures also have their disadvantages. First of all, the price: the cost of such dentures is slightly higher than the cost of a traditional denture. Comfort and aesthetics come at a price. It should also be noted that since the nylon denture does not have metal parts resting on other teeth, the entire load is distributed on the gums. Therefore, it is very important to monitor changes in the shape of the gums due to use, and reline the prosthesis in a timely manner. If not properly cared for, scratches may occur on the prosthesis. Also considered a disadvantage is the long production period.
Thus, although a nylon denture has both pros and cons, it can be used to provide high-quality, reliable and comfortable dentures. Consult your dentist and he will help you choose the most suitable option.
Advantages and disadvantages
To understand all the features of the new generation designs, it is necessary to name their main advantages.
These products, in comparison with analog products made from other materials, have the following qualities:
- Adequately distributes the chewing load.
- Not subject to change due to temperature fluctuations.
- Stable in the oral cavity.
- They have good suction to the gums and retention, i.e. Fixed perfectly to the palate and gums.
- They have a short adaptation period.
- They do not cause discomfort to the gums and soft tissues, which means they do not cause irritation.
- Comfortable to use as they are light in weight.
- Durable and easy to care for, do not require the use of special cleaning agents.
- If the operating rules are followed, the dentures do not break. Microcracks do not form on their surface if accidentally dropped.
- They are not absorbed by intraoral fluids or odors and retain their original color.
- Shows perfect aesthetics.
- They do not change the taste perception of food.
Important! Polyamide prostheses under the Deflex brand do not have the disadvantages that are inherent in analogue products made from acrylic or nylon.
The disadvantages of the structures under consideration are isolated. It should be noted:
- High cost. Not all patients can afford to install a polyamide prosthesis, so the selection of the design should be done with a specialist, taking into account all the features of the clinical case.
- Little fame. Since the material is new and has been used in dentistry relatively recently, not all clinics can offer their clients products based on it.
- Impossibility of repairs. In the event of a breakdown, polyamide devices cannot be repaired (glued or welded) and will require re-prosthetics.
Automatic thermal injection press Deflex Integra 300 + starter kit
Deflex Integra 300 + starter kit
Deflex Integra 300 + starter kit
Automatic Micro Injection Denture Making Machine with Starter Kit
| Equipment: Deflex Integra 300 with starter kit | |
| Injection device Deflex mad 1300 | 1 PC. |
| Deflex Polyamide cartridges | 1 PC. |
| Deflex Acrylato cartridges | 1 PC. |
| Deflex M10XR cartridges | 1 PC. |
| Deflex Supra SF cartridges | 1 PC. |
| Deflex Fluence cartridges | 1 PC. |
| Deflex cuvette | 1 PC. |
| Heat-resistant silicone grease | 1 PC. |
| Anti-adhesion lubricant | 1 PC. |
| Deflex polishing paste | 1 PC. |
| Fluff brush | 1 PC. |
| User manual | 1 PC. |
Deflex INTEGRA 300 Automatic programmable thermal injection machine.
The design of the heat press makes it possible to press all types of thermoplastic materials. Thanks to this, the user has the freedom to choose the material that best meets his requirements. An intuitive panel for setting denture casting modes simplifies the work of the dental technician. Automatic process control ensures stable quality of manufactured dentures. Vertical loading of the crushable cartridge and uniform pressure guarantee minimal shrinkage of materials.
- Automatic operating mode
- Heating the cuvette
- 10 Preset programs, 4 of them are configured for Deflex material, 6 programs can be programmed for other materials
- Digital membrane panel
- Sound alert robots
- Pneumatic injection cylinder
Built-in pressure regulator and pressure gauge
- Maximum temperature 500 ºС
- Recommended temperature up to 390 ºС
- Built-in heater
- Warming up the cuvette from cold to hot
- Practical cuvette clamp with protective cover
- Compact design
- Dimensions: 65x30x15 cm
DESCRIPTION
INSTALLATION
Using a hose with a diameter of Ø 8mm, connect the compressor to the compressed air inlet of the machine.
1. Air pressure: The machine is supplied set to a compressed air pressure of 5-6 atm (80/90 psi). If you need to change this value, follow the "Modify Pressure" instructions. 2. Compressor characteristics: The compressed air pressure at the compressor outlet should be set to a minimum of 7 atm (100 psi). 3. Air consumption: To supply compressed air, it is recommended to use a hose no longer than 5 m. A longer hose may cause a lack of air at the time of injection, even if the pressure gauge of the injection machine corresponds to the recommended range (5-6 atm). A sign of a lack of air can be a drop in pressure at the inlet of the machine, but the pressure gauge needle will not show a pressure value below 4 atm (55 psi).
Power supply
Insert the power cord into the outlet of the injection machine, and then plug into the electrical outlet.
INJECTION PARAMETERS
Pre-configured programs (#1-#4)
The machine has 10 injection programs. Four of them are configured for various Deflex materials (see table No. 1). The remaining 6 programs are free.
| Material Program | Classic SF 01 | Acrilato FD 02 | M10XR 03 | Supra SF 04 |
| Temperature | 280ºC / 536ºF | 265ºC / 509ºF | 305ºC / 581ºF | 260ºC / 500ºF |
| Т1 Melting time | 15 minutes | 15 minutes | 15 minutes | 15 minutes |
| T2 Injection time | 30 seconds | 30 seconds | 30 seconds | 30 seconds |
| Air pressure | 5-6 kg/cm2 75-85 PSI | 5-6 kg/cm2 75-85 PSI | 5-6 kg/cm2 75-85 PSI | 3 kg/cm2 43 PSI |
Table No. 1
Please note the required air pressure for injection of Supra SF (3 kg/cm2=43PSI).
Free Software (#5-#10)
Select the program you want to use using the UP and DOWN buttons. After selecting the desired program, press the “ENTER” button. Then press "Menu" to access the settings:
| Temp | ºC | Temperature |
| T1 | Min (min) | Melting time |
| T2 | Sec | Injection time |
Table No. 2
When you have found a setting you want to change, use the Up and Down keys to change it. After setting the desired value, confirm the operation by pressing “Enter”.
Do this operation with all parameters. After setting all parameters:
a) Press “Enter” again to start the heating cycle.
OR
b) Press the “Cancel/E” key to return to the main menu
Air pressure setting
Air pressure is adjusted by default to 5-6 kg/cm2 = 75-85 PSI. If necessary, you can configure it. Pull the pressure regulator (toward you) until it clicks, then turn clockwise to increase pressure or counterclockwise to decrease pressure. Once you have reached the desired setting, press the control until you hear a click.
A test injection (without flask or cartridge) is recommended. This allows you to equalize the pressure and set constant parameters.
INJECTION PROCEDURE
Step 1: Turn on the machine
Press the “ON” button to turn on the machine.
The machine will not start to heat up until a program is selected.
Step 2: Select a program
Select the program that will be used depending on the material (see table No. 1). Confirm your program selection by pressing the ENTER button.
Step 3: Start the heating cycle
Press "ENTER" to begin the machine's warm-up cycle.
The heating cycle (the time it takes for the machine to reach the set temperature) is approximately 20 minutes. Do not install the cartridge into the machine at this time.
Once the temperature is reached, the injector will beep, it is necessary to confirm the start of the injection cycle, but before confirming the start of the cycle, steps 4,5 and 6 below must be completed.
Step 4: Treat the cartridge with silicone
Select the desired cartridge, open the container and treat the cartridge with silicone on all sides, avoiding treatment of the lid and base.
Note: Pre-treat the mold inside the oven with silicone.
Step 5: Installing the Cartridge
Insert the cartridge. The top of the cartridge is indicated by a round symbol in the center.
Step 6: Installing the Cuvette
Step 7: Start the injection cycle
Press "ENTER" (the display will switch from "Enter to start" to "Temp:__ ºC T1_")
| Automatic injection Once the time period set in Time 1 (15 minutes, or whatever was programmed) has been completed, the material will be introduced automatically. The injection will take 30 seconds (or whatever was programmed in Time 2), then the piston will lower automatically. This will be shown on the display when the text "EXPULSION " appears. Also, until the flask is ejected, an alarm will sound. |
Step 8: Removing the Cuvette
Next steps after completion of injection:
— Unscrew the cuvette regulator
— Remove the cover of the device completely
- Using a glove, hold the cuvette and at the same time press “E/CANCEL” to activate ejection (no need to hold the button).
| Do not try to force or speed up the ejection of the cuvette by pulling upward by hand. Simply hold the cuvette tightly with your hand until the plunger releases. |
After removing the cuvette, you can press “E/CANCEL” again to lower the plunger. Otherwise, the piston will fall down automatically after 10 seconds.
Attention!: Do not touch the cartridge after injection, it is very hot!
| Repeated injections To perform a new injection using the same program, repeat everything from step 4. If you want to set new injection parameters, start from step 2. |
CARE AND MAINTENANCE
Cleaning mode:
The injector comes with a "Cleaning Mode" module, which allows you to freely raise or lower the piston to remove residual silicone base and aluminum.
To do this you need to do the following:
With the machine turned on, hold down the MENU key until CLEANINGMODE appears on the display, then press ENTER. The machine will enter cleaning mode. Open the lid completely and press “E/CANCEL” as many times as necessary to raise and lower the piston, thereby carrying out the cleaning process.
— Cleaning a heated oven. Use a swab by wrapping a paper towel around the tip of the tweezers. Wipe off any dirt or remaining residue with a swab.
— It is very important to clean the inner surface of the cuvette from any remaining plastic and other elements. Without cleaning the cuvette, the material becomes contaminated and the injected prostheses are damaged.
— The oven cleaning process should be carried out once a day or as many times as necessary to maintain complete cleanliness.
WARNINGS:
Hot surface -
Signal to read the instructions -
Grounding required -
— Keep in mind that the device is connected to a voltage of 220V or 110V.
— The power supply must be grounded and the machine must not get wet.
DANGER: Do not touch the oven while it is on.
DANGER: Never place your hands between the cuvette and its holding device.
It is normal if the display shows a temperature 4ºC higher or lower than the programmed temperature. This is not a sign of a device malfunction.
The INTEGRA 300 has an injection sensor that prevents the pneumatic piston from being activated if the lid is not closed correctly. The sensor does not work only in “Cleaning Mode”.
WARRANTY
- The warranty period established by the supplier is 1 year from the date of purchase of the machine.
- The warranty does not apply to malfunctions resulting from improper use of the machine.
- Any unauthorized repair of the machine by the user will void the warranty.
- The warranty does not cover defects resulting from accidents, incidents or natural phenomena.
- When operating the machine, use a lubricant recommended by Deflex or its authorized distributor (see Injection Procedure, Step 2).
The warranty does not cover defects resulting from the use of any other lubricants.
Watch video >>>
Installation steps
The manufacture and installation of any model of removable systems is faster and easier than non-removable products. The entire process of restoring missing teeth can be divided into 2 stages: clinical and laboratory.
The clinical stage includes the following activities:
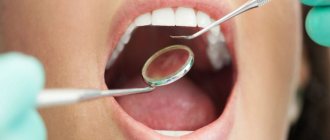
- Study of anamnesis . The doctor interviews the patient about his state of health, living conditions and occupation, studies his medical record in detail, and also finds out whether he has had experience with prosthetics and how comfortable the device was.
- Instrumental examination of the oral cavity, which determines the condition of the mucous membrane, remaining dental units, chewing muscles, and the quality of oral hygiene.
The sensitivity of teeth is assessed, the symptoms of dental pathologies are identified and the degree of their severity is determined. - Hardware examination of the dental system. Before prosthetics, CT (computed tomography), orthopantomogram, radiovisiography, MRI are used
- MRI (magnetic resonance imaging). The results are necessary to determine the limitations or indications for prosthetics, the choice of technique for restoring the dentition and the type of structure.
Thanks to a complete examination of the dental system, a specialist can identify hidden dental pathologies, obtain information about the quality, density and volume of the jaw bone, the condition of the alveoli, dental roots, periodontal tissues and the temporal joint. - Preparing the oral cavity . Hygienic cleaning, removal of remaining roots that cannot be restored and impacted dental elements, and treatment of identified pathologies (inflammation, caries, etc.) are required.
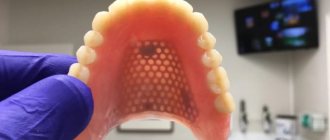
- Selecting a removable device model. Taking into account the number of remaining teeth, the condition of the oral cavity, and the location of the defect, the orthopedic dentist selects a design model.
- Receiving an impression. Using silicone or alginate mass, an impression of both jaw arches is made.
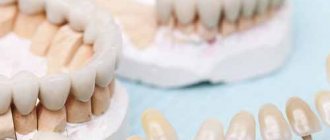
After the impression arrives at the laboratory, the laboratory stage of prosthetics begins. The entire creation process takes place in the following sequence:
- The impression technician casts models of both jaws (entirely or only certain areas), from which the prosthetic product will later be made.
- The specimens are secured so that the position corresponds to the patient's centric occlusion. To avoid making mistakes, an occlusal roller is made, which is sent to the dentist to determine the patient’s occlusion.
- The model is fixed on the articulator. In this position, a model of the future prosthesis is cast from plaster. The cushion is removed and artificial teeth are placed in its place.
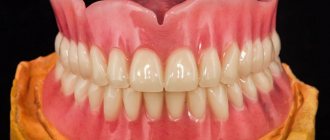
- The sample is sent for the first fitting , during which the correct selection of the shade of artificial teeth to real ones and the accuracy of closure of the jaw arches are tested.
- Fit. After checking, the model is returned to the laboratory, where the technician, taking into account all the comments, forms the final version of the design.
The finished product is tried on again for the patient. It should fit perfectly in all respects. If deficiencies are found, the design must be adjusted.
Watch the video to see how the Deflex prosthesis is made.
Possible breakdowns
Damage to the integrity of Vertex products is quite rare, however, dentists identify the following situations in which product repair may be required:
- chipping or loss of an artificial tooth is eliminated in a dental laboratory by installing a new element of the row;
- if the product adheres poorly to soft tissues, adjustment of the base may be required;
- Elimination of a broken lock is carried out by replacing it with a new one;
- When cracks or breaks in the base appear, it is repaired or a new structure is made.
Dentists pay attention that repairs should only be carried out by specialized specialists. Independent actions can cause even more damage to the structure.
Price issue
In large clinics, the cost of restoring teeth with a complete Deflex denture varies from 40 to 70 thousand rubles. The final price depends on the following points:
- the amount of treatment performed before installation;
- method of fastening the structure;
- specialist qualification;
- status and pricing policy of the clinic.
Partial models will naturally be 15-25 thousand rubles cheaper. A design that will replace only 1-3 teeth costs no more than 15 thousand rubles.
Varieties
There are:
- mini dentures for 1-2 teeth;
- partial (in the absence of three or more teeth);
- complete (replacing the dentition of the entire jaw).
Many people mistakenly believe that all flexible prostheses are nylon. This is wrong. They are very similar to the touch and in some characteristics. However, they should be considered separately.
Quadrotti prosthesis
A special modern type of prosthesis, which stands somewhere between clasp and nylon. It is more durable than the latter, has a little flexibility, and the fasteners are also not visible, unlike the clasp design, where, perhaps, this is the only drawback. The material of manufacture is monomer-free plastic.
Immediate prosthesis “butterfly”.
This is just a type of nylon prosthesis. It is used in cases where one, or less often, two teeth are missing. Small design, good replacement for a lost dental element. Produced quickly. The supporting teeth are not affected, that is, the doctor does not grind them down, they remain healthy and serve their term.
Reviews
Deflex polyamide prostheses are new and are still little known. But their use in dental restoration allows one to avoid the disadvantages that are characteristic of analogue structures made of nylon or acrylic.
You can talk about your experience of restoring missing teeth using Deflex dentures and your impressions of them by leaving a comment on this article.
If you find an error, please select a piece of text and press Ctrl+Enter.
Tags prosthetics removable dentures
Did you like the article? stay tuned
Previous article
For what purposes are temporary dental implants used?
Next article
Treatment of dental anomalies using the Schwartz apparatus
Comparison of nylon with acrylic
For the manufacture of dentures in dental practice, two types of material are most often used - nylon and acrylic.
Each of these substances has both advantages and disadvantages, which affect the convenience and duration of use of the structure.
| Features of nylon products | Features of acrylic systems |
| High density of adhesion to soft tissues due to elasticity and flexibility. | The hardness of the material often results in an insufficiently tight fit to the gums, as well as their rubbing. |
| Non-toxicity of the product. | Release of toxins with prolonged use. |
| No allergic reactions to the material. | The likelihood of developing allergies. |
| Possibility of deformation as a result of exposure to high temperatures and chewing loads. | Maintains shape throughout the entire period of operation. |
| Inability to use glue to increase the degree of fixation | Possibility of using adhesives to enhance fixation in the oral cavity. |
| Non-porous structure, thanks to which the product does not stain, does not absorb foreign odors and is not prone to plaque accumulation. | The high porosity of the material over time leads to discoloration and the accumulation of bacterial plaque. |
| High price | Affordable price |