Have you become the proud owner of such a useful device as an electric toothbrush? Then you know that in addition to the standard nozzle that comes with the device, there are several variations of nozzles. A wide selection gives rise to a lot of new questions, because if you put the attachments in, it means someone needs it! Among them, you can choose the most convenient and comfortable device that meets your individual needs. So what types of attachments are there for electronic brushes and why are they needed?
IT IS IMPORTANT
- Check all product/wires/accessories for damage from time to time. A damaged or non-functional part must not be used any longer. If the product, accessories or cords are damaged, contact an Oral-B service center. Do not repair or modify the product yourself. Doing so may cause fire, electric shock, or other damage.
- Not recommended for use by children under 3 years of age. Children and persons with reduced physical, sensory or mental capabilities or lack of experience can use the device after they have been taught how to use it safely and have been advised of the hazards.
- Cleaning and servicing of the product should not be performed by children.
- Do not allow children to play with the device.
- Use the product only for its intended purpose as described in this manual.
- Do not use accessories not recommended by the manufacturer.
CAREFULLY
- If the device is dropped, the attachment must be replaced before next use, even if there is no visible damage.
- Do not expose the charger, plug, or travel case to water or other liquids, or place them where they could accidentally fall into a sink or bathtub. If these devices fall into water, do not remove them. Unplug them immediately.
- Do not open or disassemble the device. To recycle the battery, please dispose of the entire device in accordance with the environmental regulations applicable in your area. Damage to the handle will damage the device and void the warranty.
- When unplugging the device, hold it by the plug, not the cord. Do not touch the plug with wet hands, as this may cause electric shock.
- If you are being treated for an oral condition, consult your healthcare professional before using the device.
- This toothbrush is intended for individual use and cannot be used by multiple patients in a dental clinic or institute.
- Replace the brush (head) every three months, or more often if it is very worn.
- The travel case with charging function is equipped with a special power cord (smart plug) for connecting to the network, equipped with a built-in safety extra-low voltage power supply. Do not replace or disassemble its components, as this may cause electric shock. Use only the power cord that came with your device.
Important information
- Your Oral-B toothbrush can connect to your smartphone (see Connecting your toothbrush to your smartphone for more information).
- To avoid radio interference and/or compatibility issues, turn off the radio transmitter on the brush handle (5) before using it in restricted areas such as airplanes or designated areas in hospitals.
- To turn off the radio transmitter, simultaneously press and hold the on/off button (3) and the mode button (4) for two seconds until the radio transmission display (7) goes out. Follow the same steps to turn the transmission back on.
- If you use a pacemaker, do not bring the brush closer than 15 centimeters to it while it is on. If you experience interference, immediately turn off the radio transmitter in the handle.
Kinds
First, let's list the most popular original attachments:
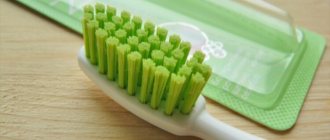
- Oral-B Braun EB-20 Precision Clean. For daily cleaning. The bristles are soft, thin, the head is small and round.
- Oral-B EB18 3D White. For whitening. In the middle of the round head there is a special cup that polishes the tooth at the same time as the medium-hard bristles clean plaque.
- Oral- B EB30 TriZone. For effective cleaning between teeth. The head has a standard shape, the bristles move perpendicularly, making sweeping movements.
- Oral-B Braun EB10K Frozen (Stages) Kids. For children from 3 years old. Round head, reciprocating movements.
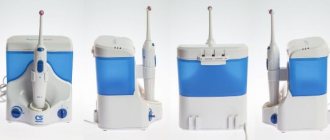
- Oral- B ED17. For the irrigator. It has “mono stream” and “turbo stream” modes. Forms bubbles.
- Oral- B Braun EB25. For daily cleaning. Medium hard bristles, round head.
- Oral-B Floss Action. With rubber inserts. The round head makes reciprocating rotational movements, cleaning teeth with bristles and leveling the enamel through processing with special elements.
- Oral- B Cross Action. Unique angled bristles, cut at the tips, combined with a round head, provide a 3D cleaning effect against plaque.
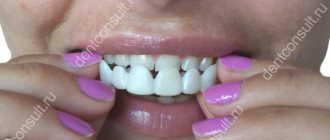
For many, it remains a mystery why gums are not injured when using an Oral-B electric brush. The point is the bristles rounded at the end. If the manual model of medium hardness, even with the slightest excess of force, causes harm, then the electric one, making more than 8000 reciprocating movements, painlessly massages the gums.
Prices
Branded products cost about 600 rubles. per piece, which is expensive, but high quality. Chinese analogues can be found at prices ranging from 80 to 270 rubles. for 4 units, the cost depends on the site and the seller. You should be wary of products that are too cheap; they may not live up to your expectations.
Price of originals and copies
Review of copies
The Chinese have long learned to counterfeit replacement nozzles, spending little on their production, due to cheap labor and mediocre quality of parts. This allows you to make the price as affordable as possible, sacrificing quality.
But not everything is so bad, there are many production facilities, suppliers purchase goods from different companies and, as practice shows, there are always good options that last as long as the originals.
Classic set: 4 pieces each, different manufacturers, unknown Chinese companies, the name of which can be seen upon close examination.
Sets suitable for Oral-B brushes are available in four types:
- Standard. Bristles of medium hardness, located at an angle.
- Whitening. Includes polishing rubber elements, thanks to which whitening is carried out.
- For interdental spaces. With rubber inserts.
- Double. Includes two heads. One rotating round and the second standard.
The first two types of attachments are not particularly durable; reviews say that they last no more than a week. First the head starts to jam, and after some time it stops working completely.
This happens due to a poorly manufactured element of the T-shaped rod, due to which the head rotates. In the original, this part is welded with high quality.
But the double nozzle caused positive emotions among buyers; due to the more powerful design, the manufacturer had to make an appropriate rotating mechanism that does not fail after a week.
There were no significant differences in hardness or quality; the sensations during use were identical. But the range of motion of the Chinese attachment is less than that of the original.
Sometimes among four pieces there is one defective one - it does not fit due to the small diameter of the hole for the rod.
Users note excessive noise of non-original products during operation. The Oral-B electric toothbrush is already quite noisy and resembles a dental drill, and with cheap replaceable heads the situation is even worse. But this is not so bad compared to the cost of the original Oral-B heads.
The cost of four pieces is in the range of 250-270 rubles.
Advantages and disadvantages of copies
Let's summarize what are the differences between the original replacement nozzle and the copy. Based on numerous customer reviews, the following shortcomings of Chinese products were identified:
- low service life due to rapid wear of the filling, while the pile remains intact;
- increased noise;
- small amplitude of head rotation;
- some structural elements are made crudely;
- Often there are defects, as a result of which the nozzle does not fit onto the rod.
In this video, the consumer compares the original and the copy:
Charging and use
Your toothbrush has a waterproof handle and is designed for safe use in the bathroom.
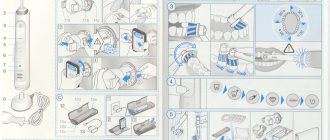
- You can start using the toothbrush immediately or after a short charging period by placing it on the charging station (9). Note: if the battery is completely discharged (the charge level indicator light on the display (8) does not light up during charging, or the device does not respond to pressing the on/off button (3)), it is necessary to charge it for at least 30 minutes.
- The charge level is displayed on the charge indicator (8). A flashing light means the brush is charging (Fig.①); Once charging is complete, the indicator light turns off. A full charge usually takes 15 hours and lasts for up to 12 days of regular toothbrush use (twice a day for two minutes) (Fig.①).
- Note: If the device is completely discharged, the indicator light may not light up for the first 30 minutes of charging.
- When the battery charge is low, the red indicator light on the charge level display starts flashing and the motor speed decreases. When completely discharged, the motor will stop; For single use, you will need to charge the device for at least 30 minutes.
- You can keep the handle on the plugged-in charger at all times to maintain a full charge; The device is protected from overcharging. Note: For best performance, store the brush handle at room temperature.
Caution : Do not expose the handle to high temperatures above 50°C.
How do you know when it's time to change your toothbrush?
10 signs it's time for you to change your toothbrush
- You have been using it for more than three months...
- Visible deformation of the bristles...
- It's awkward to hold...
- Have suffered from an infectious disease...
- We returned from a long trip...
- Fell behind the washing machine, where there is a lot of dust, or in a dirty bucket...
- A stranger accidentally brushed his teeth with it
Interesting materials:
How many missions do you need to complete for the Broken Fang Gold Coin? How many classes do you need to complete to become a driver? How much do you need to pay Steam? How many complaints does it take to block a telegram channel? How many complaints do you need for a page on VK? How long should I wait after unsuccessful attempts to log into Steam? How much oatmeal do you need per serving? How many stitches do you need to cast on for mittens? How many approaches should you do in the gym? How many repetitions should you do to lose weight?
Using your toothbrush
Teeth brushing technique
Wet the brush head and apply any toothpaste. To prevent splashing, bring the brush head close to your teeth before pressing the button on the handle (Fig.②). If you are using one of the Oral-B rotating brush heads, move it slowly from tooth to tooth, pausing on each surface for a few seconds. When using the Oral-B TriZone , place the bristles of the brush against your teeth at a slight angle to the gum line. Apply gentle pressure and begin brushing in a back-and-forth motion, similar to a manual toothbrush. Regardless of the brush head you use, start on the outside of your teeth, move to the inside, and then clean the chewing surfaces. Give equal attention to all four quadrants of the mouth.
You can also consult your dentist or oral hygienist about the technique that is best for you.
During the first few days of using any electric toothbrush, your gums may bleed a little. Usually this phenomenon stops after a few days. If bleeding gums persist for two weeks, contact your dentist or oral hygienist. If you have sensitive teeth and/or gums, Oral-B recommends using the Sensitive mode (possibly in combination with the Oral-B Sensitive brush head).
Smart Ring
Your toothbrush is equipped with Smart Ring technology, which varies depending on the color of the light: White (default) = activity indicator and visual timer (select a different color in the Oral-B™ app settings)
red = pressure sensor indicator
blue = Bluetooth® connection indicator
Timer
You can choose "Professional" or "Two Minute" mode
The “Two Minute” timer turns on a long intermittent beep and a flashing Smart Ring light (2) when two minutes have elapsed—the length of time recommended by experts for brushing your teeth.
The “Professional” timer gives a signal to move to the next quadrant of the oral cavity with a short intermittent sound signal and a flashing Smart Ring light indicator (2) (Fig. ③). A long intermittent beep and a flashing light indicate the end of the two-minute period of brushing your teeth in accordance with the recommendations of specialists.
The timer remembers the elapsed time even if the brush is turned off briefly during use. The timer is reset when there is a pause longer than 30 seconds, a short press on the mode selection button (4) during the pause, or placing the brush handle on the charger.
Note: When using special options in the Oral-B™ app, the visual timer may be deactivated.
Timer setting:
By default, your brush has the Professional timer activated. To change settings, press and hold the mode button (4) for 2 seconds. Select the timer mode with the “on/off” button (3). Confirm your choice by pressing the mode button.
- 2 light signals - “Two-minute” mode is selected
- 4 light signals - “Professional” mode is selected
Note: You can also set/adjust the timer through the Oral-B™ app.
Pressure meter
If you press too hard on the brush, the Smart Ring (2) lights up red, indicating the need to release the pressure. In addition, the head will stop pulsating and its rotation speed will decrease (in “Daily”, “Professional” and “Sensitive” modes) (Fig.③). Periodically check the operation of the pressure sensor by applying gentle pressure to the brush during use.
Operating modes (depending on model)
Your toothbrush offers different brushing modes. The selected mode is reflected in the mode display (6) on the brush handle (except for the “Daily Cleaning” mode):
“ Daily brushing ” is a standard regimen for daily oral care
“ Professional cleaning ” – for a feeling of unusual cleanliness (high frequency of movements)
“ Gentle Cleaning ” – gentle but thorough cleaning of sensitive areas
“ 3D White ” – polish for periodic or daily use
“ Gum care ” – gentle gum massage
“ Tongue hygiene ” – cleaning the tongue for periodic or daily use
To use the Tongue Hygiene mode, we recommend using the Sensitive attachment. You can clean your tongue with or without toothpaste. Brush the entire surface of the tongue with gentle, systematic movements. The recommended time is 20 seconds, its end is indicated by a flashing Smart Ring light signal.
Your toothbrush automatically starts in the last mode you selected. To switch to another mode, press the mode button successively while using the brush (Fig.④). To return to the “Daily Cleaning” mode from any other mode, press and hold the mode selection button (4).
Note: You can also select/adjust the mode through the Oral-B™ app.
Philips Sonicare
The range of attachments for Philips Sonicare electric toothbrushes is wider. These devices operate using sound vibration. Nozzles are distinguished by the stiffness of the bristles (ultra-soft, soft and medium) and by the absence or presence of the BRUSHSYNC function. The technology allows you to determine the appropriate mode and operating time for an electric brush using a chip.
Let's look at the most popular and affordable Philips Sonicare attachments:
- SONICARE C1 – PRORESULTS
. The nozzle is a standard size, medium-hard bristles, formed in accordance with the bending line of the dentition. There is no chip for additional function. - SONICARE C3 – PREMIUM PLAQUE DEFENSE. A combination of medium-hard and soft bristles, made to fit the dental contour. It differs from the first model in its flexible base for comfortable use and the presence of a chip for BrushSync.
- SONICARE I – INTERCARE. The design is designed to thoroughly clean the spaces between the elements of the dentition, which makes the nozzle suitable for users with braces. It has bristles of medium hardness and different lengths, as well as a chip.
- SONICARE G2 – OPTIMAL GUM CARE. For sensitive gums, therefore the bristles of this brush head are soft. Has a chip for additional function. The shape of the bristles follows the curve of the dentition.
The model line includes attachments for whitening tooth enamel and attachments for children's use, which are smaller in size.
The rating will help you choose the best electric toothbrush model.
Replaceable attachments
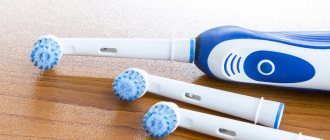
Oral-B offers you a variety of replacement attachments to fit your Oral-B handle.
Our rotating brush heads are used to precisely clean every tooth.
Oral-B CrossAction attachment
The most advanced of our attachments. Angled bristles for precise cleaning. Removes and eliminates plaque.
Oral-B FlossAction Attachment
Micropulsating bristles allow for effective plaque removal in the space between teeth
Oral-B 3D White
Special polishing cap for natural teeth whitening. Not suitable for use by children under 12 years of age.
Oral-B Sensi Ultrathin nozzle
It is a combination of regular bristles for cleaning the surface of teeth and ultra-fine bristles for cleaning areas along the gum line.
Most Oral-B brush heads are equipped with light blue INDICATOR® bristles, allowing you to keep track of when the brush head needs to be replaced. If you brush your teeth thoroughly twice a day for two minutes, the bristles will fade by half in about three months, demonstrating the need to change the brush head. If the bristles become frayed before the color has faded, you may be pressing too hard on the brush when brushing.
We do not recommend using Oral-B FlossAction or Oral-B 3D White attachments if you wear braces.
The Oral-B “Ortho” brush head is specially designed for cleaning teeth around braces and braces.
Cutting unit attachment
The cutting unit is the main component of the Philips styler. It has short and sharp edges and is used for quick and precise trimming of hair lengths.
To remove the cutting unit from the styler body, check that there is a release button on the styler body. If present, press the button to remove the cutting unit.
If your styler does not have a release button, place your finger under the teeth of the cutting unit and slide it out of the device. To reinstall, insert the bottom of the cutting unit into the styler body, then push the toothed part in until it clicks into place. Don't try too hard; this may damage the device.
If you are unable to install the cutting unit, check for foreign matter in the body of the styler and try cleaning it with a small brush or cotton swab.
Exploitation
After the first acquaintance and test run, the operating process of the device did not raise any questions for us: everything turned out to be clear and predictable. However, we would like to draw attention to some points:
- Since the trimmer is equipped with a NiMH battery, it will have to be charged in a very specific way. The instructions say that you cannot charge the battery for more than 10 hours (it may deteriorate as a result), however, you also cannot leave the device discharged for a long time - due to self-discharge, the battery may discharge below the minimum threshold and fail. Full charging time according to the instructions is 6-8 hours.
- The trimmer can work while connected to the electrical network: there is no direct prohibition in the instructions, and in fact it works in this mode, we checked. However, just in case, we would not recommend using the device in this mode.
- The floating head, in our opinion, is more of a hindrance than a help. A trimmer is not a razor, and the best shaving result is achieved when the blade is positioned at a very specific angle to the skin (it needs to be “caught”), and does not follow its contours.
- When the attachment is installed, shaving occurs with the help of one blade, while the second is not used.
Caring for your trimmer involves regularly cleaning the blades and attachments with a brush and using machine oil (as needed, every few uses).
READ What Line to Use on the Trimmer
It is recommended to wipe the housing with a dry or damp cloth.
It is recommended to clean (and/or blow out) the blades after each shaving session. It is allowed to wipe the blades with a napkin. However, it is strictly forbidden to wash the blades or body in water. The developer even warns against getting drops of water, which, in our opinion, is almost inevitable when shaving in the bathroom.
Instructions
The instructions for the device are a compact black and white brochure with a color cover, printed on matte paper.
The instructions are quite standard: here you can find safety instructions, rules for preparing for work, and tips for cutting hair, explanatory drawings and recommendations for caring for the device.
Like other instructions from Kitfort, there is very little “water” here: almost all the information will be useful, so it will be useful to read the instructions.
Having carefully studied all the available information, we found out that the trimmer cannot be used for cutting the head: it is intended only for creating the desired shape of the mustache, sideburns and beard.
Operation without an attachment (shaving stubble of different lengths)
When used without an attachment, our trimmer copes well with hair of almost any length. As a result, we get stubble similar to that which can be seen in the evening after shaving in the morning before leaving the house.
The presence of two knives theoretically allows you to shave in both directions, although, of course, in most cases only one knife will be used predominantly (or you will have to change the grip and hold the trimmer “upside down”).
We rate the quality of such a “shave” as average: it will not be possible to shave “in one pass”, and difficulties are inevitable in areas where the hair grows in different directions (it is recommended to move the trimmer strictly against the direction of stubble growth).
To achieve decent quality, we had to spend about 3.5 minutes, after which we carefully examined the result and additionally walked through the “problem” areas.
Removing the head from the Philips MG3720 trimmer
The shaved stubble falls down almost completely, that is, it does not get stuck inside the nozzle or knives. At least if we are cutting stubble and not a full beard. Well, if the nozzle does become clogged, it is easy to clean it directly during the shaving process - simply by blowing on it. It is clear that it is better to shave in this way over a sink or in any other place where there will be no problems with cleaning the cut stubble.
We had some difficulties with the formation of clear boundaries (for example, sideburns). Our trimmer was unable to form them in one movement when shaving at 90 degrees, and the need to “slither” back and forth inevitably leads to the fact that the border turns out to be blurred and indistinct.
The modern fashion for mustaches and beards, as well as for “slight unshavenness,” quite predictably generated a demand for all kinds of hair clippers and trimmers, and following the demand, supply from various brands.
READ How to Tension the Spring on a Trimmer
The hero of our today's review is one of these trimmers. Kitfort KT-3101 is distinguished by the presence of an adjustable nozzle and a floating head. Let's find out how convenient it will be to use.
At first sight
Visually, the trimmer looks quite standard: in front of us was a device very similar to similar models presented by other brands.
The body is made of black (both matte and glossy) plastic with purple plastic inserts. Glossy plastic looks downright inexpensive, matte plastic looks more “solid.”
The grip area on the back has grooves for your fingers, making the trimmer more comfortable to hold. The on/off button is located under the thumb. Below it is the company logo and LED charging indicator.
On the back side there is the model name and brief information about the device.
The head of our trimmer is removable. It is fixed in place using an automatic latch, and is removed with a special button located on the case. Removing the head, you can see the plastic pin with which the knives move.
The trimmer head itself is floating: it can deviate by several degrees. There is a rubber insert in the middle of the head, and trimmer-type knives 26 mm wide on the top and bottom.
The nozzle for adjusting hair length is made of plastic. The attachment is installed on the trimmer using a plastic latch (it requires a little force, which confused us at first).
The haircut length is adjusted by rotating a special wheel, which extends a special moving part of the nozzle, thereby setting it to one of nineteen positions corresponding to hair lengths from 0.5 to 10 mm.
The attachment is removed by “snapping off”, also with some effort (admittedly, at this point we began to worry about how strong and durable the plastic latch would be).
The power adapter connector is on the back. The trimmer is charged using a regular power cord; no special charger is required.
Additional accessories included were a bottle of oil and a brush for cleaning the head.
In general, the device looks decent (for its price category), and the solution with an adjustment wheel aroused some interest in us: we usually find a set of several attachments in the kit.
Convenience and ergonomics
Based on the results of use, we were generally left with conflicting impressions: at first acquaintance with the trimmer, the trimmer seemed to be a more than convenient device, but the operation process was somewhat overshadowed by the fact that in order to achieve the desired result, you need to shave slowly and carefully.
Our trimmer doesn’t pull the hair, but it doesn’t always shave it off the first time, which turned out to be not very convenient when creating clear boundaries.
Equipment
The trimmer comes in a compact cardboard box, inside which you can find the trimmer itself in a transparent blister, as well as accessories.
The box is decorated in the Kitfort corporate style using full-color printing. Having studied the packaging, you can get comprehensive information about the device, its technical characteristics and capabilities: everything is indicated on the back side, down to the capacity of the oil bottle.
My unboxing of the Gemei 10in1 trimmer GM-592
- the trimmer itself;
- charging cord;
- adjustable nozzle;
- oil for lubrication and a brush for cleaning;
- instructions and warranty card;
- collection magnet.
Sources:
https://www.philips.ru/cf/XC000002892/%D0%BA%D0%B0%D0%BA-%D0%B7%D0%B0%D0%BC%D0%B5%D0%BD%D0% B8%D1%82%D1%8C-%D0%BD%D0%B0%D1%81%D0%B0%D0%B4%D0%BA%D1%83-%D0%BD%D0%B0-%D1 %81%D1%82%D0%B0%D0%B9%D0%BB%D0%B5%D1%80%D0%B5-philips https://www.ixbt.com/home/kitfort-kt3101-review. html
Connecting a toothbrush to a smartphone
The Oral-B™ app is available for mobile devices running iOS or Android operating systems. It can be downloaded from App Store(SM) or Google Play™.
A sensor is built into the handle of the toothbrush, which, through a mobile application, determines the location of the toothbrush and helps brush your teeth. Use a smartphone holder (for more details, see the “Accessories – Smartphone Holder” section).
What's more, the Oral-B™ app allows you to track your brushing progress and create custom brush settings (see Oral-B™ app instructions for other benefits).
- Launch the Oral-B™ app. It will help you set up a Bluetooth connection.
- Note: The functionality of the Oral-B™ app is limited if your smartphone's Bluetooth wireless technology is disabled (refer to your smartphone's manual for connection instructions).
- All instructions for using the application will be displayed on your smartphone.
- If Bluetooth wireless technology is activated on the brush handle, the Bluetooth symbol on the radio transmission display (7) will light up. Once the connection is established, the Smart Ring (2) will blink once.
- When using the brush, keep your smartphone nearby (up to 5 m). Make sure it is placed securely in a dry place.
Note: To connect to your toothbrush, your smartphone must have Bluetooth 4.0 (or higher)/Bluetooth Smart.
A list of compatible smartphones is available in the App Store(SM) or Google Play™.
Caution: Refer to your smartphone's user manual for information regarding whether the device/charger can be used in the bathroom.
For country availability of the Oral-B™ app, see www.oralbappavailability.co.uk.
Xiaomi
The Chinese manufacturer has conquered markets through the production of smartphones, but Xiaomi’s range of capabilities does not end with these gadgets. Xiaomi electric toothbrushes compete with other popular brands. They differ from analogues from other manufacturers in their elegant, laconic design. Most toothbrush sets only have one brush head included, but there are also sets with two and three heads.
Xiaomi divides attachments into several categories:
- CLEAN
. A range of standard accessories for everyday use. Recommended for use for a healthy oral cavity. - MINI
. Small, as the name suggests, a round nozzle. Designed for teeth whitening. - INTER
. Specialized bristles for cleaning orthodontic structures such as braces, dentures, bridges and others. - SOFT
. For users with sensitive teeth. This attachment is characterized by soft bristles. - DEEP CLEANING HEAD
. A nozzle for more thorough cleaning of the oral cavity and removing a greater percentage of plaque.
There are also special attachments for children, which are smaller in size than adults. Xiaomi electric toothbrushes can be synchronized with an application on your phone for more comfortable use. In the application, you can select an operating mode (for example, gum massage or a mode for sensitive teeth), and adjust the cleaning time.
Accessories
(Depending on model)
Smartphone holder
- Before each use, make sure that the mirror to which the holder will be attached, the suction cups (11d) and the holder brackets (11a) are clean and dry (Fig. B1). Use a smooth cloth to clean the surface of the suction cups and mirror. Make sure the surface of the suction cups and mirror is clean (no dust, hair, oil, lint, dirt, etc.).
- Gently press the smartphone holder (11) with sufficient force, attaching it approximately at nose level to the mirror. Then install the holder by pressing the lever (11b) until it clicks into place (Figure B2). Note: For proper and safe use, do not attach the holder to surfaces other than a mirror. For bathroom use only. Do not use in a car.
- Make sure the holder is securely attached to the mirror before placing your smartphone on it. Place the smartphone in a vertical position between the holder brackets (11a), pressing alternately on one of the brackets and pushing the second one to the side (Fig. B2). To remove the smartphone, repeat the procedure.
- Place the smartphone at the desired angle by turning the ball joint of the holder (Fig. B3).
- After brushing your teeth, remove your smartphone from the holder. To remove the holder, release the lever and carefully pull the tab (Fig. B4 1./2). Re-attach the holder to the mirror each time you use it.
- The smartphone holder can only be cleaned with a damp cloth (Fig.⑤). You can use glass cleaner, alcohol or similar products (avoid products with silicone oil). Make sure the surface is dry and clean. Store the holder in a clean and dry place. Do not leave your smartphone in the holder after use.
Note: Required smartphone width: no less than 58 mm, no more than 83 mm.
Caution : Small parts may break off, keep away from children.
Refer to your smartphone's manual for information on whether the device/charger can be used in the bathroom.
Travel charging module
- To charge the toothbrush handle (5), place it on the lip of the travel charger (12) and connect it to power using the optional power cord (13).
- The flashing indicator light (12a) of the travel charging module indicates that charging is in progress. When fully charged, the indicator turns off. A full charge takes up to 12 hours (Figure C1). Note: When the travel charger is plugged in, you can use the USB port (12b) to charge any other electronic device. The toothbrush can only be charged via the power cord (13)/(12c), but not via the USB port.
- The internal lighting unit of the travel charging module has a built-in holder (12d) on which you can place your smartphone while using the brush (Fig. C2). Before use, make sure that the smartphone fits the dimensions of the stand and is securely fastened.
- The removable inner layer (fig. C3) (12e) of the travel charging module can be washed in the dishwasher (fig. ⑤). The external module is cleaned with a damp cloth. Make sure the parts are completely dry before assembly and that the toothbrush/head is dry before placing it in the module.
Note: Remove stains from the surface of the module immediately. Store the module in a clean and dry place.
Refer to your smartphone's user manual for information on whether the device/charger can be used in the bathroom.
Cosmetic bag
Keep the toothbrush clean and dry in the travel case (15) in the cosmetic bag (14) (Fig. D1/2). Immediately remove stains from the surface of the brush. The cosmetic bag can only be washed by hand in warm water (30°C-40°C) (Fig. ⑤). Store in a dry, clean place.
Comb attachment
To remove this attachment from the cutting unit, carefully lift the back of the attachment off the unit and then slide the attachment off the cutting unit. To attach any guard to the cutting unit, slide the front of the guard onto the teeth of the cutting unit. Then press down on the central part of the guard with your fingers or palm.
Watch the video below to learn how to use our new Philips Prestige Beard Trimmer with its unique built-in comb. Please note that shaver functionality may vary depending on the model type.
Warranty
We [Braun] provide a two-year warranty on the product from the date of purchase.
During the warranty period, we [Braun] agree to correct, free of charge, any product defects resulting from defects in materials or workmanship by repairing or replacing the product at our option.
This warranty applies to all countries in which the device is supplied by Braun or its designated distributor. The warranty does not cover damage resulting from misuse or normal wear and tear of the product, especially with regard to attachments, or defects that have a minor effect on the operation of the device.
The product will be voided if repairs are carried out by unauthorized persons or if non-original Braun spare parts are used.
The device is equipped with an approved Bluetooth Smart radio module. Failure to establish a Bluetooth Smart connection with certain smartphone models is not covered by the warranty unless the device's Bluetooth radio module is damaged.
The warranty for Bluetooth devices is provided by the manufacturers of such devices and not by Oral-B. Oral-B does not have any influence or recommendation on the manufacturers of such devices and therefore is not responsible for the number of devices that are compatible with our Bluetooth systems.
Oral-B reserves the right, without prior notice, to make any technological modifications or changes in the system implementation of individual device elements, its interface or menu structure that it deems necessary for the proper functioning of these systems.
To carry out warranty service, hand over or send the device, complete and with a sales receipt, to an authorized Oral-B Braun Consumer Service Center.
Information
Bluetooth® radio module
Although Oral-B supports all designated Bluetooth device functions, we cannot guarantee 100% reliability of the connection and operation of the radio.
The performance and reliability of the connection directly depend on the characteristics of each specific Bluetooth device, the software version, the operating system installed on the Bluetooth device and the safety standards established by the manufacturer. Oral-B strictly adheres to the Bluetooth standard, which allows Bluetooth devices to connect and operate in conjunction with Oral-B toothbrushes.
However, if the device manufacturer does not comply with this standard, it may affect the compatibility and operation of Bluetooth devices and cause difficulties for the user. Please note that the software installed on your Bluetooth device may significantly affect connectivity and performance.
1) Warranty - exclusions and limitations
The limited warranty applies only to new products manufactured by or for The Procter & Gamble Company (“P&G”), its affiliates and subsidiaries and bearing the Braun/Oral-B brand, trademark or logo. The Limited Warranty does not apply to non-P&G products, including hardware and software. P&G is not responsible for damage to or loss of programs, data or other information stored on any media embedded in the product or for any product or part not manufactured by or for P&G and not covered by the limited warranty.
This limited warranty does not cover (i) damage caused by accident, abuse, careless or improper use or application, or damage to products not manufactured by or for P&G; (ii) damage caused by service performed by persons other than Braun and Braun-authorized service centers; (iii) products and parts modified without the written permission of P&G and (iv) damage caused by the use or inability to use the Oral-B Smartphone Stand, Smartphone Holder or Travel Case (“Accessories”),
2) Using a smartphone holder
The included Oral-B accessories allow you to conveniently position your smartphone while using the Oral-B app. Before using it for the first time, try out different positions of your smartphone in the Oral-B holder and choose the best one. Make sure that the smartphone will not fall or break. Do not use the accessory in a car.
LIMITATION OF LIABILITY
TO THE EXTENT PERMITTED BY APPLICABLE LAW, IN NO EVENT SHALL P&G, ITS DISTRIBUTORS OR SUPPLIERS BE LIABLE TO YOU OR ANY THIRD PARTY FOR ANY KIND, DIRECT, INDIRECT, INDIRECT, INCIDENTAL, CONSEQUENTIAL, PUNITIVE DAMAGES OF ANY NATURE ARISING OUT OF USE OR INABILITY USE OF ORAL-B ACCESSORIES, INCLUDING WITHOUT LIMITATION, INJURY TO PERSON, DAMAGE TO PROPERTY, DEPRESSION OF THIRD PARTY PRODUCTS USED IN OR IN COMBINATION WITH ORAL-B ACCESSORIES, LOSS OF PERFORMANCE ORAL-B ACCESSORIES OR THIRD PARTY PRODUCTS USED IN OR IN CONJUNCTION WITH ORAL-B ACCESSORIES, INCLUDING P&G NOTIFYING THE POSSIBILITY OF SUCH AN OUTCOME. WITHOUT LIMITATION TO THE FOREGOING, YOU UNDERSTAND AND ACKNOWLEDGE THAT P&G SHALL NOT HAVE ANY RESPONSIBILITY FOR DAMAGE OR DESTRUCTION TO ANY CONSUMER ELECTRONIC DEVICES OR THIRD PARTY PROPERTY CONTAINED IN OR USED IN CONNECTION WITH ORAL ACCESSORIES. B, AS WELL AS FOR LOSS OF DATA CONTAINED IN THE MENTIONED DEVICES . IN NO EVENT SHALL ORAL-B'S REFUND EXCEED THE ACTUAL PRICE PAID FOR THE PRODUCT UPON PURCHASE.
Warranty for replacement tips
The device will be voided from Oral-B's warranty if damage to the device's electric rechargeable handle occurs as a result of using replacement attachments from another manufacturer.
- Oral-B does not recommend the use of refills from other manufacturers.
- Oral-B cannot control the quality of these brush heads and therefore cannot guarantee the quality of teeth cleaning they will provide, as stated upon initial purchase of the electric rechargeable handpiece.
- Oral-B cannot guarantee the compatibility of the Oral-B Handle with refills from other manufacturers.
- Oral-B cannot predict the long-term impact of using other brands of refills on handle wear.
All Orai-B refills have the appropriate logo and meet Oral-B's high quality standards. Oral-B does not sell refills or handpiece replacement parts under other brand names.
CS Medica
The CS Medica brand is a Russian manufacturer of medical devices used in everyday life by ordinary people. Among the manufactured products there are electric toothbrushes, and, accordingly, for them. For each device there is a corresponding suitable nozzle. Since a set with a brush usually contains only one component, you should order additional attachments.
Most of the brush heads produced by CS Medica have a special indicator to determine when the bristles have reached the end of their shelf life. Some of the bristles of the nozzle are bright blue. If you notice that the color has faded, then you need to replace the nozzle.
The product line includes brushes of round and oblong shapes, of varying degrees of bristle hardness, made to match the shape of the teeth and with even bristles, of different colors from white to red and black. Among the attachments there are also children's models. Ease of use lies in the fact that adult attachments can be compatible with a children's electric brush.
The most popular attachments are:
- CS MEDICA SP-51, SP-52
. Accessories for children's toothbrushes. The first device is for the youngest users of CS Medica devices up to five years old, the second is for children over 5-6 years old. - CS MEDICA RP-85
. An adult nozzle, made in a round version with rotating bristles. The center remains motionless while cleaning the oral cavity. - CS MEDICA SP-21
. Adult device for effective cleaning of teeth.
When purchasing brush heads, be sure to check their compatibility with electric toothbrushes.
Trouble-shooting
| Problem | Possible reason | Remedy |
| The brush does not work (does not work properly) with the Oral-B™ app |
|
|
| Resetting settings to factory defaults | Requires original mobile app functionality | Press and hold the on/off button (3) for 10 seconds until all indicator lights turn on twice simultaneously. |
| The brush does not work (on first use) | Low battery level; no light indication. | Charge for at least half an hour. |
| The brush does not work with SmartGuide. |
|
|
|
|
|
| The brush does not dress up |
| The charge indicator may not start flashing immediately, but may take up to 30 minutes. The recommended ambient temperature for charging the battery is from 5 °C to 35 °C. |
This electric toothbrush is equipped with a Bluetooth radio module operating in the 2.4-2.48 GHz range with a maximum power of 1 mW.
Braun GmbH therefore declares that radio equipment types 3765, 3754, 3764,3762 and 3767 comply with the requirements of EU Directive 2014/53/EU. The full text of the European Declaration of Conformity is available for review on the following Internet page: https://www.oralb.com/ce
Made in Germany
Production date code:
To determine the year and month of manufacture, look at the manufacture code located on the charger or handle plate. Find a code (minimum 11 characters) starting with a letter.
Charger: The first digit of the code indicates the year of manufacture. The next two digits indicate the calendar week of the year of production.
For example: "509" means that the product was produced in the 9th week of 2015. Handle: The first digit of the production code indicates the year of production. The next two digits indicate the month of production.
For example: "509" means that the product was produced in September 2015.
Manufactured in Germany for Braun GmbH, Frankfurter Strasse 145, 61476 Kronberg, Germany/Braun GmbH, Frankfurter Strasse 145, 61476 Kronberg, Germany
RU Importer/Consumer Service: Procter and Gamble Distribution Company LLC, Russia, 125171, Moscow, Leningradskoe Shosse, 16A, building 2. Tel. 8-800-200-20-20
BY Suppliers to the Republic of Belarus: LLC "Electroservice and Co", Belarus, 220012, Minsk, st. Chernyshevsky, 10A, room 412AZ., IOO "ALIDI-West", 220140, Belarus, Minsk, st. Dombrovskaya, 9, of. 7.3.1. Service, Belarus, 220012, Minsk, st. Chernyshevsky, 10A, room 115 B
Warranty period/Service life: 2 years.
E.A.C.
Electric toothbrush type 3765 with charger type 3757, with portable charger type 3760 and mains adapter type 492-5214
220-240 Volts, 50-60 Hertz, 0.9 Watt
Electric shock protection class: II
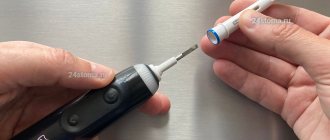
Replacing the head on an electric toothbrush
In this post, we will take a closer look at how to replace the head on an electric toothbrush . This is done quite simply and quickly.
Using an electric toothbrush requires periodically replacing the brush heads with new ones. As we already know, replacement nozzles need to be changed at least once every three months.
But if you have just recently switched from a regular toothbrush to an electric one, the question may arise - how to do this correctly? The mechanism for replacing nozzles is quite simple, takes little time and requires minimal effort.
Even a child can change the brush head on an electric toothbrush!
When we buy an electric toothbrush, we receive instructions on how to use it. But the situation is completely different with toothbrush heads: rarely does any manufacturer write detailed instructions on how to replace the head with a new one. It is not a problem to replace the nozzle if you have already done a similar procedure before. Or at least seen other people doing it.
But what should you do if you are going to replace the head on your electric toothbrush for the first time?
What do you need to know about changing brush heads on an electric toothbrush?
We have already mentioned the frequency of replacing nozzles. What other considerations or precautions are there when replacing the brush head on an electric toothbrush?
As with any hygiene products, it is worth paying attention to a number of general rules. They are more concerned with personal hygiene and careful attitude towards replacing the element itself - the replaceable nozzle:
- Before replacing, wash your hands with soap and water.
- Be careful when opening the pack of attachments to avoid accidentally dropping them on the floor.
- Remove the old nozzle and install a new one in its place.
These rules are quite simple, but they should not be neglected. One of the most important rules, which essentially does not apply to the process of replacing the nozzle itself: before you start replacing the nozzle, be sure to wash your hands with soap. This necessary measure will prevent various harmful microbes from entering the body.
How to change the head on an electric toothbrush?
As mentioned earlier, the mechanism for replacing the nozzle itself is quite simple. The video explains in detail how to replace the head on an electric toothbrush :
Choosing the right head for an electric toothbrush
There are a large number of attachments for electric toothbrushes in order to clean the tooth as thoroughly and better as possible.
Some people use one type of attachment and always brush their teeth with it, changing the attachment every 2-3 months.
Modern brush heads have indicators to assess the condition of the bristles. Basically, color indicators; when the color fades or wears off, it is advisable to replace the nozzle with a new one.
For replacement speed
The attachment is influenced by how intensively the electric toothbrush is used, how much pressure is applied to it, and what movements the brush makes to clean the teeth. The originality of the nozzle also affects the service life.
Some companies make universal attachments that are suitable for several models of electric toothbrushes, and there are attachments that are suitable only for their brush.
My opinion is that for high-quality teeth cleaning, different types of attachments alone are not enough; manual teeth cleaning skills are important.
Universal nozzle
is as follows: the bristles are set widely, the length of the bristles allows you to completely encircle the tooth, it has a sufficient length of the neck, there are color indicators of the degree of wear.
Universal nozzle
Specialized attachments
have additions in the working part. Additions include rubber inserts and strips, intersecting bristles, and rubber cups for toothpaste.
Specialized nozzle
With additional inserts into the working part of the toothbrush, the useful number of bristles is noticeably reduced. And, as you know, the more bristles in the nozzle, the better its cleaning properties. Therefore, additional elements can indirectly help keep teeth clean.
Specialized attachments
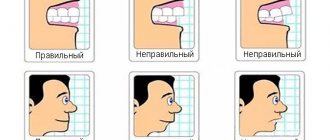
Adult electric toothbrush heads
Adult heads for electric toothbrushes are distinguished by a variety of choices and sizes of the working part. Basically, the color of adult baits is a conservative one-color white, gray, black. If two family members use an electric brush, then it is possible to alternate use of the handle, replacing the nozzle with its own color indicator in the form of a colored ring. Of course, every person should have their own toothbrush. But in terms of electricity, it turns out that each will have its own nozzle with a color indicator, and the handle will be common.
Color rings to differentiate attachments
This option is considered a budget option. Rather than buying each family member their own individual electric toothbrush.
Children's electric toothbrush heads
Children's attachments are also replaceable, but the attachments themselves are smaller. Children's attachments differ in color and feature famous cartoon characters. Baby heads have a limited selection of bristle types; most often, the bristles are simply arranged in a bowl without additional rubber inserts.
Which electric toothbrush head do you prefer?
.
I recommend watching:
- What is NIBLER for children. How does it help with teething?
- Which children's toothpaste is suitable for infants.
- How to choose a toothbrush for an adult? The cost of the brush and its quality.